Selenium Generated Driver
Why not just record in the IDE and play the recording with WebDriver
The IDE Does Not Know What to Wait For
Suppose Bob is performing manual checks and recording his interaction with Selenium IDE. He performs an operation that takes a while to update the GUI, and when the operation has finished, he clicks a button. Bob knows that the GUI has finished updating because a spinner that was show when the operation started is removed when the operation is finished. How is the IDE going to capture the fact that the operation must have finished before clicking on the button. Note here this is not a case where the button is disabled until the operation is finished. This is not a hypothetical: when you test dynamic tables like those managed by DataTables, the user can change anything at any time.
This can be one of the reasons a sequence of commands created with the IDE would fail with WebDriver. It just does not know what to wait for.
It is possible to add waits manually in the IDE but if you are doing this, then you are no longer just record ing all of our test cases. And what you are doing becomes more like writing code for WebDriver.
Not long ago there was a Selenium question in which the user wanted to get Selenium to click on the last record in a table that had multiple pages of records. So the question was, how can I page through the table, all the way down to the last page and then click the last record. Someone maybe me, maybe someone else pointed out that if the table is sortable, it could be sorted in reverse order and then the Selenium code could click on the first record. That s 2 operations rather than p 1 operations: clicking p times, where p is the number of pages, plus 1 time for the click on the record.
When we write code for WebDriver, we have the opportunity to write the tests to avoid taking the scenic route to get the results we want. See the next point for the technical details as to why it matters.
Selenium Operations Can Be Costly
If the software that runs your Selenium commands is local, and your browser is local, you may not feel that Selenium operations can be costly but if you run your commands on one machine and the browser is remote, then you will notice a significant slowdown. For instance, if you spawn your browser in a Sauce Labs VM or in a BrowserStack VM to run a test suite, network delays are going to add significant time to how long it takes the suite to complete. For a complete application test suite, this can mean many minutes more.
The IDE produces a sequence of commands that each require a round-trip between the Selenium script and the browser. Each round-trip adds up. Suppose I want to check that two elements contain the same text. I m not going to use Selenese because I don t usually use the IDE but using WebDriver code in Python, the script could be:
a driver.find_element_by_id a
b driver.find_element_by_id b
This code requires 4 round-trips: one round-trip per find_element and one per access to the text field. The same test could be written:
a_text, b_text driver.execute_script
var a document.getElementById a ;
var b document.getElementById b ;
return a.textcontent, b.textContent ;
This needs only one round-trip. When you use the IDE to record actions, the sequence of commands is like the earlier snippet: lots of round-trips. When you write your code for WebDriver, you have the opportunity to optimize as you code.
This does not mean that the Selenium IDE has no use but I would never ever think of just recording tests with it and then playing those recordings with WebDriver.
Selenium::WebDriver::Driver; show all Includes: File rb/lib/selenium/webdriver/common/driver.rb, Generated on Thu Jul 19 :27.
Selenium WebDriver. The biggest change in Selenium recently has been the inclusion of the WebDriver API. Driving a browser natively as a user would either locally or.
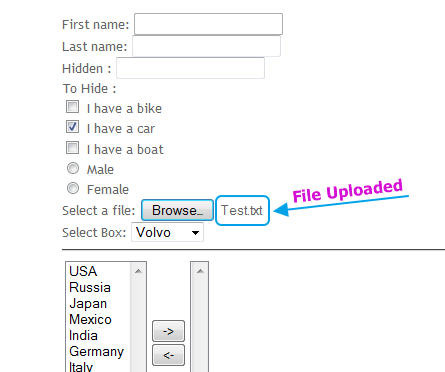
Sets a file input upload field to the file listed in fileLocator fieldLocator is an element locator fileLocator is a URL pointing to the specified file.
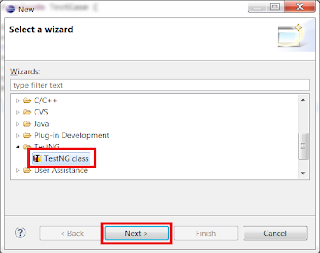
Today we are going to see how we can record the test case using Selenium IDE convert recorded script to Java WebDriver format execute the automated test script.
Selenium WebDriver — Selenium Documentation
NOTE: We re currently working on documenting these sections.
We believe the information here is accurate, however be aware we are also still working on this
chapter. Additional information will be provided as we go which should make this chapter more
The primary new feature in Selenium 2.0 is the integration of the WebDriver API.
WebDriver is designed to provide a simpler, more concise programming interface in addition to
addressing some limitations in the Selenium-RC API. Selenium-WebDriver was developed
to better support dynamic web pages where elements of a page may change without the page
itself being reloaded. WebDriver s goal is to supply a well-designed object-oriented
API that provides improved support for modern advanced web-app testing problems.
How Does WebDriver Drive the Browser Compared to Selenium-RC.
Selenium-WebDriver makes direct calls to the browser using each browser s native support for automation.
How these direct calls are made, and the features they support depends on the browser you are using.
Information on each browser driver is provided later in this chapter.
For those familiar with Selenium-RC, this is quite different from what you are used to. Selenium-RC
worked the same way for each supported browser. It injected javascript functions into the browser
when the browser was loaded and then used its javascript to drive the AUT within the browser.
WebDriver does not use this technique. Again, it drives the browser directly using the browser s
built in support for automation.
WebDriver and the Selenium-Server
You may, or may not, need the Selenium Server, depending on how you intend to use Selenium-WebDriver.
If you will be only using the WebDriver API you do not need the Selenium-Server. If your browser
and tests will all run on the same machine, and your tests only use the WebDriver API, then you
do not need to run the Selenium-Server; WebDriver will run the browser directly.
There are some reasons though to use the Selenium-Server with Selenium-WebDriver.
You are using Selenium-Grid to distribute your tests over multiple machines or virtual machines VMs.
You want to connect to a remote machine that has a particular browser version that is not on
You are not using the Java bindings i.e. Python, C, or Ruby and would like to use HtmlUnit Driver
Setting Up a Selenium-WebDriver Project
To install Selenium means to set up a project in a development so you can write a program using
Selenium. How you do this depends on your programming language and your development environment.
The easiest way to set up a Selenium 2.0 Java project is to use Maven. Maven will download the
java bindings the Selenium 2.0 java client library and all its dependencies, and will create the
project for you, using a maven pom.xml project configuration file. Once you ve done this, you
can import the maven project into your preferred IDE, IntelliJ IDEA or Eclipse.
First, create a folder to contain your Selenium project files. Then, to use Maven, you need a
pom.xml file. This can be created with a text editor. We won t teach the
details of pom.xml files or for using Maven since there are already excellent references on this.
Your pom.xml file will look something like this. Create this file in the folder you created for
Be sure you specify the most current version. At the time of writing, the version listed above was
the most current, however there were frequent releases immediately after the release of Selenium 2.0.
Check the Maven download page for the current release and edit the above dependency accordingly.
Now, from a command-line, CD into the project directory and run maven as follows.
This will download Selenium and all its dependencies and will add them to the project.
Finally, import the project into your preferred development environment. For those not familiar
with this, we ve provided an appendix which shows this.
Importing a maven project into IntelliJ IDEA.
Importing a maven project into Eclipse.
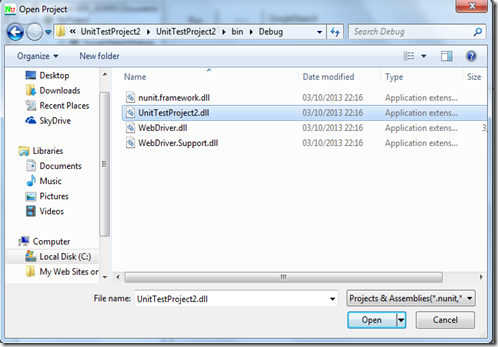
As of Selenium 2.2.0, the C bindings are distributed as a set of signed dlls along with other
dependency dlls. Prior to 2.2.0, all Selenium dll s were unsigned.
To include Selenium in your project, simply download the latest
selenium-dotnet zip file from
If you are using Windows Vista or above, you should unblock the zip file before
unzipping it: Right click on the zip file, click Properties, click Unblock
Unzip the contents of the zip file, and add a reference to each of the unzipped
dlls to your project in Visual Studio or your IDE of choice.
If you are using Python for test automation then you probably are already familiar with developing
in Python. To add Selenium to your Python environment run the following command from
Pip requires pip to be installed, pip also has a dependency
Teaching Python development itself is beyond the scope of this document, however there are many
resources on Python and likely developers in your organization can help you get up to speed.
If you are using Ruby for test automation then you probably are already familiar with developing
in Ruby. To add Selenium to your Ruby environment run the following command from
gem install selenium-webdriver
Teaching Ruby development itself is beyond the scope of this document, however there are many
resources on Ruby and likely developers in your organization can help you get up to speed.
Perl bindings are provided by a third party, please refer to any of their documentation on how to
install / get started. There is one known Perl binding as of this writing.
For those who already have test suites written using Selenium 1.0, we have provided tips on how to
migrate your existing code to Selenium 2.0. Simon Stewart, the lead developer for Selenium 2.0,
has written an article on migrating from Selenium 1.0. We ve included this as an appendix.
Migrating From Selenium RC to Selenium WebDriver
Introducing the Selenium-WebDriver API by Example
WebDriver is a tool for automating web application testing, and in particular
to verify that they work as expected. It aims to provide a friendly API that s
easy to explore and understand, easier to use than the Selenium-RC 1.0 API,
which will help to make your tests easier to
read and maintain. It s not tied to any particular test framework, so it can
be used equally well in a unit testing or from a plain old main method.
This section introduces WebDriver s API and helps get you started becoming
familiar with it. Start by setting up a WebDriver project if you haven t already.
This was described in the previous section, Setting Up a Selenium-WebDriver Project.
Once your project is set up, you can see that WebDriver acts just as any normal library:
it is entirely self-contained, and you usually don t need to remember to start any
additional processes or run any installers before using it, as opposed to the proxy server
Note: additional steps are required to use ChromeDriver, Opera Driver, Android Driver
You re now ready to write some code. An easy way to get started is this
example, which searches for the term Cheese on Google and then outputs the
result page s title to the console.
package org.openqa.selenium.example;
import org.openqa.selenium.By;
import org.openqa.selenium.WebDriver;
import org.openqa.selenium.WebElement;
import org.openqa.selenium.firefox.FirefoxDriver;
import org.openqa.selenium.support.ui.ExpectedCondition;
import org.openqa.selenium.support.ui.WebDriverWait;
public static void main String args
// Create a new instance of the Firefox driver
// Notice that the remainder of the code relies on the interface,
WebDriver driver new FirefoxDriver ;
// And now use this to visit Google
// Alternatively the same thing can be done like this
// Find the text input element by its name
WebElement element driver.findElement By.name q ;
// Enter something to search for
// Now submit the form. WebDriver will find the form for us from the element
// Check the title of the page
System.out.println Page title is: driver.getTitle ;
// Google s search is rendered dynamically with JavaScript.
// Wait for the page to load, timeout after 10 seconds
new WebDriverWait driver, 10. until new ExpectedConditionBoolean
public Boolean apply WebDriver d
return d.getTitle. toLowerCase. startsWith cheese. ;
// Should see: cheese. - Google Search
using OpenQA.Selenium.Firefox;
// Requires reference to WebDriver.Support.dll
using OpenQA.Selenium.Support.UI;
// Create a new instance of the Firefox driver.
// Further note that other drivers InternetExplorerDriver,
// ChromeDriver, etc. will require further configuration
// before this example will work. See the wiki pages for the
IWebDriver driver new FirefoxDriver ;
//Notice navigation is slightly different than the Java version
//This is because get is a keyword in C
IWebElement query driver.FindElement By.Name q ;
WebDriverWait wait new WebDriverWait driver, TimeSpan.FromSeconds 10 ;
wait.Until d return d.Title.ToLower. StartsWith cheese ; ;
// Should see: Cheese - Google Search
System.Console.WriteLine Page title is: driver.Title ;
from selenium import webdriver
from selenium.common.exceptions import TimeoutException
from selenium.webdriver.support.ui import WebDriverWait available since 2.4.0
from selenium.webdriver.support import expected_conditions as EC available since 2.26.0
Create a new instance of the Firefox driver
the page is ajaxy so the title is originally this:
find the element that s name attribute is q the google search box
inputElement driver.find_element_by_name q
inputElement.send_keys cheese.
submit the form although google automatically searches now without submitting
we have to wait for the page to refresh, the last thing that seems to be updated is the title
WebDriverWait driver, 10. until EC.title_contains cheese.
You should see cheese. - Google Search
driver Selenium::WebDriver.for :firefox
element driver.find_element :name q
puts Page title is driver.title
wait Selenium::WebDriver::Wait.new :timeout 10
wait.until driver.title.downcase.start_with. cheese.
puts Page title is driver.title
var driver new webdriver.Builder. build ;
var element driver.findElement webdriver.By.name q ;
driver.getTitle. then function title
console.log Page title is: title ;
return driver.getTitle. then function title
return title.toLowerCase. lastIndexOf cheese., 0 0;
Create a new instance of the driver
my driver Selenium::Remote::Driver- new;
Find the element that s name attribute is q google search box
my inputElement driver- find_element q, name ;
inputElement- send_keys cheese. ;
submit the form although google automatically searches now without submitting
Set the timeout for searching for elements to 10 seconds 0 by default
driver- set_implicit_wait_timeout 10000 ;
then use XPath to search for a page title containing cheese.
driver- find_element /html/head/title contains translate. , ABCDEFGHIJKLMNOPQRSTUVWXYZ, abcdefghijklmnopqrstuvwxyz, cheese. ;
In upcoming sections, you will learn more about how to use WebDriver for things
such as navigating forward and backward in your browser s history, and how to
test web sites that use frames and windows. We also provide a more
thorough discussions and examples.
Selenium-WebDriver API Commands and Operations
The first thing you re likely to want to do with WebDriver is navigate to a page.
The normal way to do this is by calling get :
Dependent on several factors, including the OS/Browser combination,
WebDriver may or may not wait for the page to load. In some circumstances,
WebDriver may return control before the page has finished, or even started, loading.
To ensure robustness, you need to wait for the element s to exist in the page using
Locating UI Elements WebElements
Locating elements in WebDriver can be done on the WebDriver instance itself or on a WebElement.
Each of the language bindings expose a Find Element and Find Elements method. The first returns
a WebElement object otherwise it throws an exception. The latter returns a list of WebElements, it can
return an empty list if no DOM elements match the query.
The Find methods take a locator or query object called By. By strategies are listed below.
This is the most efficient and preferred way to locate an element. Common pitfalls that UI developers
make is having non-unique id s on a page or auto-generating the id, both should be avoided. A class
on an html element is more appropriate than an auto-generated id.
Example of how to find an element that looks like this:
WebElement element driver.findElement By.id coolestWidgetEvah ;
IWebElement element driver.FindElement By.Id coolestWidgetEvah ;
element driver.find_element :id, coolestWidgetEvah
element driver.find_element_by_id coolestWidgetEvah
from selenium.webdriver.common.by import By
element driver.find_element by By.ID, value coolestWidgetEvah
element driver- find_element coolestWidgetEvah, id
Class in this case refers to the attribute on the DOM element. Often in practical use there are
many DOM elements with the same class name, thus finding multiple elements becomes the more practical
option over finding the first element.
class cheese Cheddar class cheese Gouda
ListWebElement cheeses driver.findElements By.className cheese ;
IListIWebElement cheeses driver.FindElements By.ClassName cheese ;
cheeses driver.find_elements :class_name, cheese
cheeses driver.find_elements :class, cheese
cheeses driver.find_elements_by_class_name cheese
cheeses driver.find_elements By.CLASS_NAME, cheese
cheeses driver- find_elements cheese, class ;
The DOM Tag Name of the element.
WebElement frame driver.findElement By.tagName iframe ;
IWebElement frame driver.FindElement By.TagName iframe ;
frame driver.find_element :tag_name, iframe
frame driver.find_element_by_tag_name iframe
frame driver.find_element By.TAG_NAME, iframe
frame driver- find_element iframe, tag_name ;
Find the input element with matching name attribute.
WebElement cheese driver.findElement By.name cheese ;
IWebElement cheese driver.FindElement By.Name cheese ;
cheese driver.find_element :name, cheese
cheese driver.find_element_by_name cheese
cheese driver.find_element By.NAME, cheese
cheese driver- find_element cheese, name ;
Find the link element with matching visible text.
WebElement cheese driver.findElement By.linkText cheese ;
IWebElement cheese driver.FindElement By.LinkText cheese ;
cheese driver.find_element :link_text, cheese
cheese driver.find_element :link, cheese
cheese driver.find_element_by_link_text cheese
cheese driver.find_element By.LINK_TEXT, cheese
cheese driver- find_element cheese, link_text ;
Find the link element with partial matching visible text.
WebElement cheese driver.findElement By.partialLinkText cheese ;
IWebElement cheese driver.FindElement By.PartialLinkText cheese ;
cheese driver.find_element :partial_link_text, cheese
cheese driver.find_element_by_partial_link_text cheese
cheese driver.find_element By.PARTIAL_LINK_TEXT, cheese
cheese driver- find_element cheese, partial_link_text ;
Like the name implies it is a locator strategy by css. Native browser support
is used by default, so please refer to w3c css selectors for a list of generally available css selectors. If a browser does not have
native support for css queries, then Sizzle is used. IE 6,7 and FF3.0
currently use Sizzle as the css query engine.
Beware that not all browsers were created equal, some css that might work in one version may not work
Example of to find the cheese below:
id food class dairy milk class dairy aged cheese
WebElement cheese driver.findElement By.cssSelector food span.dairy.aged ;
IWebElement cheese driver.FindElement By.CssSelector food span.dairy.aged ;
cheese driver.find_element :css, food span.dairy.aged
cheese driver.find_element_by_css_selector food span.dairy.aged
cheese driver.find_element By.CSS_SELECTOR, food span.dairy.aged
cheese driver- find_element food span.dairy.aged, css ;
At a high level, WebDriver uses a browser s native XPath capabilities wherever
possible. On those browsers that don t have native XPath support, we have
provided our own implementation. This can lead to some unexpected behaviour
unless you are aware of the differences in the various xpath engines.
This is a little abstract, so for the following piece of HTML:
ListWebElement inputs driver.findElements By.xpath //input ;
IListIWebElement inputs driver.FindElements By.XPath //input ;
inputs driver.find_elements :xpath, //input
inputs driver.find_elements_by_xpath //input
inputs driver.find_elements By.XPATH, //input
inputs driver- find_elements //input
The following number of matches will be found
Sometimes HTML elements do not need attributes to be explicitly declared
because they will default to known values. For example, the input tag does
not require the type attribute because it defaults to text. The rule of
thumb when using xpath in WebDriver is that you should not expect to be able
to match against these implicit attributes.
You can execute arbitrary javascript to find an element and as long as you return a DOM Element,
it will be automatically converted to a WebElement object.
Simple example on a page that has jQuery loaded:
WebElement element WebElement JavascriptExecutor driver. executeScript return . cheese 0 ;
IWebElement element IWebElement IJavaScriptExecutor driver. ExecuteScript return . cheese 0 ;
element driver.execute_script return . cheese 0
element driver- execute_script return . cheese 0 ;
Finding all the input elements to the every label on a page:
ListWebElement labels driver.findElements By.tagName label ;
ListWebElement inputs ListWebElement JavascriptExecutor driver. executeScript
var labels arguments 0, inputs ; for var i 0; i
inputs.push document.getElementById labels i. getAttribute for ; return inputs;, labels ;
IListIWebElement labels driver.FindElements By.TagName label ;
IListIWebElement inputs IListIWebElement IJavaScriptExecutor driver. ExecuteScript
labels driver.find_elements :tag_name, label
inputs.push document.getElementById labels i. getAttribute for ; return inputs;, labels
labels driver.find_elements_by_tag_name label
my labels driver- find_elements label, tag_name ;
my inputs driver- execute_script var labels arguments, inputs ; for var i 0; i, labels ;
Moving Between Windows and Frames
Some web applications have many frames or multiple windows. WebDriver supports
moving between named windows using the switchTo method:
driver.switchTo. window windowName ;
driver.switch_to.window windowName
driver- switch_to_window windowName ;
All calls to driver will now be interpreted as being directed to the
particular window. But how do you know the window s name. Take a look at the
javascript or link that opened it:
href somewhere.html target windowName Click here to open a new window
Alternatively, you can pass a window handle to the switchTo. window
method. Knowing this, it s possible to iterate over every open window like so:
for String handle : driver.getWindowHandles
driver.switchTo. window handle ;
driver.window_handles.each do handle
driver.switch_to.window handle
for handle in driver.window_handles:
windows driver- get_window_handles
driver- switch_to_window window ;
You can also switch from frame to frame or into iframes :
driver.switchTo. frame frameName ;
driver.switch_to.frame frameName
driver- switch_to_frame frameName ;
Navigation: History and Location
Earlier, we covered navigating to a page using the get command
driver.get As you ve seen, WebDriver has a
number of smaller, task-focused interfaces, and navigation is a useful task.
Because loading a page is such a fundamental requirement, the method to do this
lives on the main WebDriver interface, but it s simply a synonym to:
driver.get python doesn t have driver.navigate
To reiterate: navigate. to and get do exactly the same thing.
One s just a lot easier to type than the other.
The navigate interface also exposes the ability to move backwards and forwards in your browser s history:
Please be aware that this functionality depends entirely on the underlying
browser. It s just possible that something unexpected may happen when you call
these methods if you re used to the behaviour of one browser over another.
Before we leave these next steps, you may be interested in understanding how to
use cookies. First of all, you need to be on the domain that the cookie will be
valid for. If you are trying to preset cookies before
you start interacting with a site and your homepage is large / takes a while to load
an alternative is to find a smaller page on the site, typically the 404 page is small
// Now set the cookie. This one s valid for the entire domain
Cookie cookie new Cookie key, value ;
driver.manage. addCookie cookie ;
// And now output all the available cookies for the current URL
SetCookie allCookies driver.manage. getCookies ;
for Cookie loadedCookie : allCookies
System.out.println String.format s - s, loadedCookie.getName, loadedCookie.getValue ;
// You can delete cookies in 3 ways
driver.manage. deleteCookieNamed CookieName ;
driver.manage. deleteCookie loadedCookie ;
driver.manage. deleteAllCookies ;
Now set the cookie. Here s one for the entire domain
the cookie name here is key and its value is value
driver.add_cookie name : key, value : value, path : /
additional keys that can be passed in are:
expiry - Milliseconds since the Epoch it should expire.
And now output all the available cookies for the current URL
for cookie in driver.get_cookies :
print s - s cookie name, cookie value
You can delete cookies in 2 ways
driver.delete_cookie CookieName
driver.manage.add_cookie :name key, :value value
:path String, :secure - Boolean, :expires - Time, DateTime, or seconds since epoch
driver.manage.all_cookies.each cookie
puts cookie :name cookie :value
driver.manage.delete_cookie CookieName
driver.manage.delete_all_cookies
the cookie name here is key and its value is value
driver- add_cookie key, value, /, example.com, 0 ;
additional required inputs are path and domain
the final input secure is an optional boolean
my cookies_ref driver- get_all_cookies ; Returns reference to AoH
printf s s n, cookie_ref- name, cookie_ref- value ;
driver- delete_cookie_named key ;
This is easy with the Firefox Driver:
FirefoxProfile profile new FirefoxProfile ;
profile.addAdditionalPreference general.useragent.override, some UA string ;
WebDriver driver new FirefoxDriver profile ;
profile Selenium::WebDriver::Firefox::Profile.new
profile general.useragent.override some UA string
driver Selenium::WebDriver.for :firefox, :profile profile
profile webdriver.FirefoxProfile
profile.set_preference general.useragent.override, some UA string
driver webdriver.Firefox profile
use Selenium::Remote::Driver::Firefox::Profile;
my profile Selenium::Remote::Driver::Firefox::Profile- new;
profile- set_preference general.useragent.overide some UA string ;
my driver Selenium::Remote::Driver- new firefox_profile profile ;
Here s an example of using the Actions class to perform a drag and drop.
Native events are required to be enabled.
WebElement element driver.findElement By.name source ;
WebElement target driver.findElement By.name target ;
new Actions driver. dragAndDrop element, target. perform ;
element driver.find_element :name source
target driver.find_element :name target
driver.action.drag_and_drop element, target. perform
from selenium.webdriver.common.action_chains import ActionChains
element driver.find_element_by_name source
target driver.find_element_by_name target
ActionChains driver. drag_and_drop element, target. perform
Driver Specifics and Tradeoffs
WebDriver is the name of the key interface against which tests should be
written, but there are several implementations. These include:
This is currently the fastest and most lightweight implementation of WebDriver.
As the name suggests, this is based on HtmlUnit. HtmlUnit is a java based implementation
of a WebBrowser without a GUI. For any language binding other than java the
Selenium Server is required to use this driver.
WebDriver driver new HtmlUnitDriver ;
IWebDriver driver new RemoteWebDriver new Uri
DesiredCapabilities.HtmlUnit ;
driver webdriver.Remote webdriver.DesiredCapabilities.HTMLUNIT.copy
driver Selenium::WebDriver.for :remote, :url :desired_capabilities :htmlunit
my driver Selenium::Remote::Driver- new browser_name htmlunit, remote_server_addr localhost, port 4444 ;
Fastest implementation of WebDriver
A pure Java solution and so it is platform independent.
Emulates other browsers JavaScript behaviour see below
JavaScript in the HtmlUnit Driver
None of the popular browsers uses the JavaScript engine used by HtmlUnit
Rhino. If you test JavaScript using HtmlUnit the results may differ
significantly from those browsers.
When we say JavaScript we actually mean JavaScript and the DOM. Although
the DOM is defined by the W3C each browser has its own quirks and differences
in their implementation of the DOM and in how JavaScript interacts with it.
HtmlUnit has an impressively complete implementation of the DOM and has good
support for using JavaScript, but it is no different from any other
browser: it has its own quirks and differences from both the W3C standard and
the DOM implementations of the major browsers, despite its ability to mimic
With WebDriver, we had to make a choice; do we enable HtmlUnit s JavaScript
capabilities and run the risk of teams running into problems that only manifest
themselves there, or do we leave JavaScript disabled, knowing that there are
more and more sites that rely on JavaScript. We took the conservative approach,
and by default have disabled support when we use HtmlUnit. With each release of
both WebDriver and HtmlUnit, we reassess this decision: we hope to enable
JavaScript by default on the HtmlUnit at some point.
If you can t wait, enabling JavaScript support is very easy:
HtmlUnitDriver driver new HtmlUnitDriver true ;
WebDriver driver new RemoteWebDriver new Uri
DesiredCapabilities.HtmlUnitWithJavaScript ;
caps Selenium::WebDriver::Remote::Capabilities.htmlunit :javascript_enabled true
driver Selenium::WebDriver.for :remote, :url :desired_capabilities caps
driver webdriver.Remote webdriver.DesiredCapabilities.HTMLUNITWITHJS
driver new Selenium::Remote::Driver browser_name firefox, port 4444, version, platform LINUX, javascript 1, auto_close 1 ;
This will cause the HtmlUnit Driver to emulate Firefox 3.6 s JavaScript
Controls the Firefox browser using a Firefox plugin.
The Firefox Profile that is used is stripped down from what is installed on the
machine to only include the Selenium WebDriver.xpi plugin. A few settings are
also changed by default see the source to see which ones
Firefox Driver is capable of being run and is tested on Windows, Mac, Linux.
Currently on versions 3.6, 10, latest - 1, latest
Slower than the HtmlUnit Driver
Suppose that you wanted to modify the user agent string as above, but you ve
got a tricked out Firefox profile that contains dozens of useful extensions.
There are two ways to obtain this profile. Assuming that the profile has been
created using Firefox s profile manager firefox -ProfileManager :
ProfilesIni allProfiles new ProfilesIni ;
FirefoxProfile profile allProfiles.getProfile WebDriver ;
profile.setPreferences foo.bar, 23 ;
Alternatively, if the profile isn t already registered with Firefox:
File profileDir new File path/to/top/level/of/profile ;
FirefoxProfile profile new FirefoxProfile profileDir ;
profile.addAdditionalPreferences extraPrefs ;
As we develop features in the Firefox Driver, we expose the ability to use them.
For example, until we feel native events are stable on Firefox for Linux, they
are disabled by default. To enable them:
profile.setEnableNativeEvents true ;
profile.native_events_enabled True
This driver is controlled by a. dll and is thus only available on Windows OS.
Each Selenium release has its core functionality tested against versions
6, 7 and 8 on XP, and 9 on Windows7.
WebDriver driver new InternetExplorerDriver ;
IWebDriver driver new InternetExlorerDriver ;
driver Selenium::WebDriver.for :ie
my driver Selenium::Remote::Driver- new browser_name internet explorer ;
Runs in a real browser and supports JavaScript with all the quirks
Obviously the Internet Explorer Driver will only work on Windows.
Comparatively slow though still pretty snappy
XPath is not natively supported in most versions. Sizzle is injected automatically
which is significantly slower than other browsers and slower when comparing to CSS
selectors in the same browser.
CSS is not natively supported in versions 6 and 7. Sizzle is injected instead.
CSS selectors in IE 8 and 9 are native, but those browsers don t fully support CSS3
ChromeDriver is maintained / supported by the Chromium
project iteslf. WebDriver works with Chrome through the chromedriver binary found on the chromium
project s download page. You need to have both chromedriver and a version of chrome browser installed.
chromedriver needs to be placed somewhere on your system s path in order for WebDriver to automatically
discover it. The Chrome browser itself is discovered by chromedriver in the default installation path.
These both can be overridden by environment variables. Please refer to the wiki
WebDriver driver new ChromeDriver ;
IWebDriver driver new ChromeDriver ;
driver Selenium::WebDriver.for :chrome
my driver Selenium::Remote::Driver- new browser_name chrome ;
Runs in a real browser and supports JavaScript
Because Chrome is a Webkit-based browser, the ChromeDriver may allow you to
verify that your site works in Safari. Note that since Chrome uses its own V8
JavaScript engine rather than Safari s Nitro engine, JavaScript execution may
See either the ios-driver or appium projects.
Alternative Back-Ends: Mixing WebDriver and RC Technologies
The Java version of WebDriver provides an implementation of the Selenium-RC API. These means that
you can use the underlying WebDriver technology using the Selenium-RC API. This is primarily
provided for backwards compatibility. It allows those who have existing test suites using the
Selenium-RC API to use WebDriver under the covers. It s provided to help ease the migration path
to Selenium-WebDriver. Also, this allows one to use both APIs, side-by-side, in the same test code.
Selenium-WebDriver is used like this:
// You may use any WebDriver implementation. Firefox is used here as an example
// A base url, used by selenium to resolve relative URLs
// Create the Selenium implementation
Selenium selenium new WebDriverBackedSelenium driver, baseUrl ;
// Perform actions with selenium
selenium.type name q, cheese ;
// Get the underlying WebDriver implementation back. This will refer to the
// same WebDriver instance as the driver variable above.
WebDriver driverInstance WebDriverBackedSelenium selenium. getWrappedDriver ;
//Finally, close the browser. Call stop on the WebDriverBackedSelenium instance
//instead of calling driver.quit. Otherwise, the JVM will continue running after
//the browser has been closed.
Allows for the WebDriver and Selenium APIs to live side-by-side
Provides a simple mechanism for a managed migration from the Selenium RC API
Does not require the standalone Selenium RC server to be run
Does not implement every method
More advanced Selenium usage using browserbot or other built-in JavaScript
methods from Selenium Core may not work
Some methods may be slower due to underlying implementation differences
Backing WebDriver with Selenium
WebDriver doesn t support as many browsers as Selenium RC does, so in order to
provide that support while still using the WebDriver API, you can make use of
Safari is supported in this way with the following code be sure to disable
DesiredCapabilities capabilities new DesiredCapabilities ;
capabilities.setBrowserName safari ;
CommandExecutor executor new SeleneseCommandExecutor new URL new URL capabilities ;
WebDriver driver new RemoteWebDriver executor, capabilities ;
There are currently some major limitations with this approach, notably that
findElements doesn t work as expected. Also, because we re using Selenium Core
for the heavy lifting of driving the browser, you are limited by the JavaScript
Running Standalone Selenium Server for use with RemoteDrivers
From Selenium s Download page download selenium-server-standalone-.jar and optionally IEDriverServer. If you plan to work with Chrome, download it from Google Code.
Unpack IEDriverServer and/or chromedriver and put them in a directory which is on the PATH / PATH - the Selenium Server should then be able to handle requests for IE / Chrome without additional modifications.
Start the server on the command line with
java -jar /selenium-server-standalone-.jar
If you want to use native events functionality, indicate this on the command line with the option
-Dwebdriver.enable.native.events 1
For other command line options, execute
java -jar /selenium-server-standalone-.jar -help
In order to function properly, the following ports should be allowed incoming TCP connections: 4444, 7054-5 or twice as many ports as the number of concurrent instances you plan to run. Under Windows, you may need to unblock the applications as well.
You can find further resources for WebDriver
Of course, don t hesitate to do an internet search on any Selenium topic, including
Selenium-WebDriver s drivers. There are quite a few blogs on Selenium along with numerous posts
on various user forums. Additionally the Selenium User s Group is a great resource.
This chapter has simply been a high level walkthrough of WebDriver and some of its key
capabilities. Once getting familiar with the Selenium-WebDriver API you will then want to learn
how to build test suites for maintainability, extensibility, and reduced fragility when features of
the AUT frequently change. The approach most Selenium experts are now recommending is to design
your test code using the Page Object Design Pattern along with possibly a Page Factory.
Selenium-WebDriver provides support for this by supplying a PageFactory class in Java and C.
This is presented, along with other advanced topics, in the
next chapter. Also, for high-level description of this
technique, you may want to look at the
Test Design Considerations chapter. Both of these
chapters present techniques for writing more maintainable tests by making your test code more
File lib/selenium/client/generated_driver.rb, line 1628 1628: def shut_down_selenium_server 1629.
Migrating From Selenium RC to Selenium WebDriver. A class on an html element is more appropriate than an auto-generated including Selenium-WebDriver s drivers.

Aug 01, 2014 WebDriverJS User s Guide. WebDriverJS User s Guide; Getting Started; Installing from NPM; Building from Source; Using the Stand-alone Selenium Server.
Selenium Client GeneratedDriver File rb/lib/selenium/client/legacy_driver In this case a visible dialog WILL be generated and Selenium will.
I want to know is any other option available to generate test report except TestNG framework in selenium webdriver.
Why do we use WebDriver instead of Selenium IDE?
Canon Scanner Canoscan 3200f Driver
We use cookies to provide you with the best possible experience on our website. By utilising our website you agree to the placement of cookies on your device.
Canon 3200F Driver VueScan is an You need to install a Canon driver to use this scanner on Windows and Mac OS X. Unfortunately.


- CANON U.S.A.,Inc. MAKES NO CanoScan 3200F Box Contents CanoScan 3200F Scanner USB Cable AC Adapter Film the latest driver downloads and answers.
- CanoScan photo and document Canon CanoScan 3200F. Back to top. Drivers; Software; Manuals; Firmware; FAQs; Left Right. Available Drivers 0 For certain.
- Canon CanoScan 3200F. Back to top. Drivers; Software; Manuals; Firmware; FAQs; Left Right. Available software 0 Register your product and manage your Canon iD.
- Canon CanoScan 3200F. CanoScan Toolbox brings all the scanner applications together Increased resolution is a function of the ScanGear CS driver.


VueScan is an application for Windows, Mac OS X and Linux that replaces the software that came with your scanner. Download VueScan today to see why 10 million people have used it to get the most out of their scanner.
VueScan is an application for Windows, Mac OS X, and Linux that is compatible with over 2800 scanners from 35 scanner manufacturers. If your scanner is no longer supported by your Operating System, or you want more advanced features, download VueScan today.
Works with the Canon 3200F on Windows and Mac OS X
There s more technical information about VueScan s support for your scanner at the bottom of this page.
Great for Beginner and Pro Users
We built VueScan so that two completely different types of users can use it. Beginners only need to run VueScan and press the Scan button, and can press the More button to use basic options. Pro users can press the Advanced button to unlock powerful features to have complete control over your scans.
Outputs scans in a variety of formats
VueScan can output scanned documents, photos, and film in PDF, JPEG and TIFF formats. It can also recognize text using OCR and create multi-page pdfs using both flatbed scanners and scanners with automatic document feeders.
Canon 3200F Technical Information
VueScan works with the Canon 3200F on Windows and Mac OS X.
This scanner has an infrared lamp for scanning film. VueScan s Filter Infrared clean option can be used to remove dust spots from film scans. This is similar to and we think better than the ICE and FARE algorithms.
It scans with visible light in the first pass and with infrared light in the second pass.
Infrared cleaning works well with all types of color negative and color slide film, including Kodachrome. However, silver-based black/white film doesn t work with infrared cleaning because the silver particles look the same in visible light and infrared light.
You need to install a Canon driver to use this scanner on Windows and Mac OS X.
Unfortunately, Canon doesn t have a driver for this scanner on Windows x64.
This scanner isn t supported on Mac OS X Lion and later, since Canon uses a PowerPC plugin for this scanner and Rosetta isn t available with Lion and later.
On Mac OS X prior to Lion, you need to use the x32 version of VueScan 9.0.96 with Rosetta. To do this:
Click on the VueScan icon while holding the Control key
Putty Serial Port Loopback
WARNING: attaching a serial port will certainly void your warranty and could destroy your unit.
Previous Contents Index Next. Chapter 3: Using PuTTY. 3.1 During your session. 3.1.1 Copying and pasting text; 3.1.2 Scrolling the screen back; 3.1.3 The System.

Sending Files. Here are two helpful little methods for sending files through the serial port. Of course, these are the bare essentials and as always, you should check.
May 18, 2009 Downloading and setting up teraterm on windows xp for serial connection to a Cisco router console port. Changing the default COM port for the USB-DB9.
Chapter 3: Using PuTTY
Previous Contents Index Next. Chapter 4: Configuring PuTTY. 4.1 The Session panel. 4.1.1 The host name section; 4.1.2 Loading and storing saved sessions.
PuTTY: a free SSH and Telnet client. Home Licence FAQ Docs Download Keys Links Mirrors Updates Feedback Changes Wishlist Team.
If you then open your Serial Monitor on you PC, and set the baudrate to 57600 you should get the following message: Connected to PC. If you then reboot your вЂ.
Previous Contents Index Next
This chapter provides a general introduction to some more advanced features of PuTTY. For extreme detail and reference purposes, chapter 4 is likely to contain more information.
3.1 During your session
A lot of PuTTY s complexity and features are in the configuration panel. Once you have worked your way through that and started a session, things should be reasonably simple after that. Nevertheless, there are a few more useful features available.
3.1.1 Copying and pasting text
Often in a PuTTY session you will find text on your terminal screen which you want to type in again. Like most other terminal emulators, PuTTY allows you to copy and paste the text rather than having to type it again. Also, copy and paste uses the Windows clipboard, so that you can paste for example URLs into a web browser, or paste from a word processor or spreadsheet into your terminal session.
PuTTY s copy and paste works entirely with the mouse. In order to copy text to the clipboard, you just click the left mouse button in the terminal window, and drag to select text. When you let go of the button, the text is automatically copied to the clipboard. You do not need to press Ctrl-C or Ctrl-Ins; in fact, if you do press Ctrl-C, PuTTY will send a Ctrl-C character down your session to the server where it will probably cause a process to be interrupted.
Pasting is done using the right button or the middle mouse button, if you have a three-button mouse and have set it up; see section 4.11.2. Pressing Shift-Ins, or selecting Paste from the Ctrl right-click context menu, have the same effect. When you click the right mouse button, PuTTY will read whatever is in the Windows clipboard and paste it into your session, exactly as if it had been typed at the keyboard. Therefore, be careful of pasting formatted text into an editor that does automatic indenting; you may find that the spaces pasted from the clipboard plus the spaces added by the editor add up to too many spaces and ruin the formatting. There is nothing PuTTY can do about this.
If you double-click the left mouse button, PuTTY will select a whole word. If you double-click, hold down the second click, and drag the mouse, PuTTY will select a sequence of whole words. You can adjust precisely what PuTTY considers to be part of a word; see section 4.11.5. If you triple-click, or triple-click and drag, then PuTTY will select a whole line or sequence of lines.
If you want to select a rectangular region instead of selecting to the end of each line, you can do this by holding down Alt when you make your selection. You can also configure rectangular selection to be the default, and then holding down Alt gives the normal behaviour instead. See section 4.11.4 for details.
If you have a middle mouse button, then you can use it to adjust an existing selection if you selected something slightly wrong. If you have configured the middle mouse button to paste, then the right mouse button does this instead. Click the button on the screen, and you can pick up the nearest end of the selection and drag it to somewhere else.
It s possible for the server to ask to handle mouse clicks in the PuTTY window itself. If this happens, the mouse pointer will turn into an arrow, and using the mouse to copy and paste will only work if you hold down Shift. See section 4.6.2 and section 4.11.3 for details of this feature and how to configure it.
3.1.2 Scrolling the screen back
PuTTY keeps track of text that has scrolled up off the top of the terminal. So if something appears on the screen that you want to read, but it scrolls too fast and it s gone by the time you try to look for it, you can use the scrollbar on the right side of the window to look back up the session history and find it again.
As well as using the scrollbar, you can also page the scrollback up and down by pressing Shift-PgUp and Shift-PgDn. You can scroll a line at a time using Ctrl-PgUp and Ctrl-PgDn. These are still available if you configure the scrollbar to be invisible.
By default the last 200 lines scrolled off the top are preserved for you to look at. You can increase or decrease this value using the configuration box; see section 4.7.3.
3.1.3 The System menu
If you click the left mouse button on the icon in the top left corner of PuTTY s terminal window, or click the right mouse button on the title bar, you will see the standard Windows system menu containing items like Minimise, Move, Size and Close.
PuTTY s system menu contains extra program features in addition to the Windows standard options. These extra menu commands are described below.
These options are also available in a context menu brought up by holding Ctrl and clicking with the right mouse button anywhere in the PuTTY window.
3.1.3.1 The PuTTY Event Log
If you choose Event Log from the system menu, a small window will pop up in which PuTTY logs significant events during the connection. Most of the events in the log will probably take place during session startup, but a few can occur at any point in the session, and one or two occur right at the end.
You can use the mouse to select one or more lines of the Event Log, and hit the Copy button to copy them to the clipboard. If you are reporting a bug, it s often useful to paste the contents of the Event Log into your bug report.
3.1.3.2 Special commands
Depending on the protocol used for the current session, there may be a submenu of special commands. These are protocol-specific tokens, such as a break signal, that can be sent down a connection in addition to normal data. Their precise effect is usually up to the server. Currently only Telnet, SSH, and serial connections have special commands.
The break signal can also be invoked from the keyboard with Ctrl-Break.
The following special commands are available in Telnet:
Are You There
Break
Synch
Erase Character
PuTTY can also be configured to send this when the Backspace key is pressed; see section 4.16.3.
Erase Line
Go Ahead
No Operation
Should have no effect.
Abort Process
Abort Output
Interrupt Process
PuTTY can also be configured to send this when Ctrl-C is typed; see section 4.16.3.
Suspend Process
PuTTY can also be configured to send this when Ctrl-Z is typed; see section 4.16.3.
End Of Record
End Of File
In an SSH connection, the following special commands are available:
IGNORE message
Repeat key exchange
Only available in SSH-2. Forces a repeat key exchange immediately and resets associated timers and counters. For more information about repeat key exchanges, see section 4.19.2.
Only available in SSH-2, and only during a session. Optional extension; may not be supported by server. PuTTY requests the server s default break length.
Signals SIGINT, SIGTERM etc
Only available in SSH-2, and only during a session. Sends various POSIX signals. Not honoured by all servers.
With a serial connection, the only available special command is Break.
3.1.3.3 Starting new sessions
PuTTY s system menu provides some shortcut ways to start new sessions:
Selecting New Session will start a completely new instance of PuTTY, and bring up the configuration box as normal.
Selecting Duplicate Session will start a session in a new window with precisely the same options as your current one - connecting to the same host using the same protocol, with all the same terminal settings and everything.
In an inactive window, selecting Restart Session will do the same as Duplicate Session, but in the current window.
The Saved Sessions submenu gives you quick access to any sets of stored session details you have previously saved. See section 4.1.2 for details of how to create saved sessions.
3.1.3.4 Changing your session settings
If you select Change Settings from the system menu, PuTTY will display a cut-down version of its initial configuration box. This allows you to adjust most properties of your current session. You can change the terminal size, the font, the actions of various keypresses, the colours, and so on.
Some of the options that are available in the main configuration box are not shown in the cut-down Change Settings box. These are usually options which don t make sense to change in the middle of a session for example, you can t switch from SSH to Telnet in mid-session.
You can save the current settings to a saved session for future use from this dialog box. See section 4.1.2 for more on saved sessions.
3.1.3.5 Copy All to Clipboard
This system menu option provides a convenient way to copy the whole contents of the terminal screen up to the last nonempty line and scrollback to the clipboard in one go.
3.1.3.6 Clearing and resetting the terminal
The Clear Scrollback option on the system menu tells PuTTY to discard all the lines of text that have been kept after they scrolled off the top of the screen. This might be useful, for example, if you displayed sensitive information and wanted to make sure nobody could look over your shoulder and see it. Note that this only prevents a casual user from using the scrollbar to view the information; the text is not guaranteed not to still be in PuTTY s memory.
The Reset Terminal option causes a full reset of the terminal emulation. A VT-series terminal is a complex piece of software and can easily get into a state where all the text printed becomes unreadable. This can happen, for example, if you accidentally output a binary file to your terminal. If this happens, selecting Reset Terminal should sort it out.
3.1.3.7 Full screen mode
If you find the title bar on a maximised window to be ugly or distracting, you can select Full Screen mode to maximise PuTTY even more. When you select this, PuTTY will expand to fill the whole screen and its borders, title bar and scrollbar will disappear. You can configure the scrollbar not to disappear in full-screen mode if you want to keep it; see section 4.7.3.
When you are in full-screen mode, you can still access the system menu if you click the left mouse button in the extreme top left corner of the screen.
3.2 Creating a log file of your session
For some purposes you may find you want to log everything that appears on your screen. You can do this using the Logging panel in the configuration box.
To begin a session log, select Change Settings from the system menu and go to the Logging panel. Enter a log file name, and select a logging mode. You can log all session output including the terminal control sequences, or you can just log the printable text. It depends what you want the log for. Click Apply and your log will be started. Later on, you can go back to the Logging panel and select Logging turned off completely to stop logging; then PuTTY will close the log file and you can safely read it.
See section 4.2 for more details and options.
3.3 Altering your character set configuration
If you find that special characters accented characters, for example, or line-drawing characters are not being displayed correctly in your PuTTY session, it may be that PuTTY is interpreting the characters sent by the server according to the wrong character set. There are a lot of different character sets available, so it s entirely possible for this to happen.
If you click Change Settings and look at the Translation panel, you should see a large number of character sets which you can select, and other related options. Now all you need is to find out which of them you want. See section 4.10 for more information.
3.4 Using X11 forwarding in SSH
The SSH protocol has the ability to securely forward X Window System applications over your encrypted SSH connection, so that you can run an application on the SSH server machine and have it put its windows up on your local machine without sending any X network traffic in the clear.
In order to use this feature, you will need an X display server for your Windows machine, such as Cygwin/X, X-Win32, or Exceed. This will probably install itself as display number 0 on your local machine; if it doesn t, the manual for the X server should tell you what it does do.
You should then tick the Enable X11 forwarding box in the Tunnels panel see section 4.22 before starting your SSH session. The X display location box is blank by default, which means that PuTTY will try to use a sensible default such as :0, which is the usual display location where your X server will be installed. If that needs changing, then change it.
Now you should be able to log in to the SSH server as normal. To check that X forwarding has been successfully negotiated during connection startup, you can check the PuTTY Event Log see section 3.1.3.1. It should say something like this:
2001-12-05 :01 Requesting X11 forwarding
2001-12-05 :02 X11 forwarding enabled
If the remote system is Unix or Unix-like, you should also be able to see that the DISPLAY environment variable has been set to point at display 10 or above on the SSH server machine itself:
fred unixbox: echo DISPLAY
unixbox:10.0
If this works, you should then be able to run X applications in the remote session and have them display their windows on your PC.
Note that if your PC X server requires authentication to connect, then PuTTY cannot currently support it. If this is a problem for you, you should mail the PuTTY authors and give details see appendix B.
For more options relating to X11 forwarding, see section 4.22.
3.5 Using port forwarding in SSH
The SSH protocol has the ability to forward arbitrary network connections over your encrypted SSH connection, to avoid the network traffic being sent in clear. For example, you could use this to connect from your home computer to a POP-3 server on a remote machine without your POP-3 password being visible to network sniffers.
In order to use port forwarding to connect from your local machine to a port on a remote server, you need to:
Choose a port number on your local machine where PuTTY should listen for incoming connections. There are likely to be plenty of unused port numbers above 3000. You can also use a local loopback address here; see below for more details.
Now, before you start your SSH connection, go to the Tunnels panel see section 4.23. Make sure the Local radio button is set. Enter the local port number into the Source port box. Enter the destination host name and port number into the Destination box, separated by a colon for example, popserver.example.com:110 to connect to a POP-3 server.
Now click the Add button. The details of your port forwarding should appear in the list box.
Now start your session and log in. Port forwarding will not be enabled until after you have logged in; otherwise it would be easy to perform completely anonymous network attacks, and gain access to anyone s virtual private network. To check that PuTTY has set up the port forwarding correctly, you can look at the PuTTY Event Log see section 3.1.3.1. It should say something like this:
2001-12-05 :10 Local port 3110 forwarding to
popserver.example.com:110
Now if you connect to the source port number on your local PC, you should find that it answers you exactly as if it were the service running on the destination machine. So in this example, you could then configure an e-mail client to use localhost:3110 as a POP-3 server instead of popserver.example.com:110. Of course, the forwarding will stop happening when your PuTTY session closes down.
You can also forward ports in the other direction: arrange for a particular port number on the server machine to be forwarded back to your PC as a connection to a service on your PC or near it. To do this, just select the Remote radio button instead of the Local one. The Source port box will now specify a port number on the server note that most servers will not allow you to use port numbers under 1024 for this purpose.
An alternative way to forward local connections to remote hosts is to use dynamic SOCKS proxying. For this, you will need to select the Dynamic radio button instead of Local, and then you should not enter anything into the Destination box it will be ignored. This will cause PuTTY to listen on the port you have specified, and provide a SOCKS proxy service to any programs which connect to that port. So, in particular, you can forward other PuTTY connections through it by setting up the Proxy control panel see section 4.15 for details.
The source port for a forwarded connection usually does not accept connections from any machine except the SSH client or server machine itself for local and remote forwardings respectively. There are controls in the Tunnels panel to change this:
The Local ports accept connections from other hosts option allows you to set up local-to-remote port forwardings including dynamic port forwardings in such a way that machines other than your client PC can connect to the forwarded port.
The Remote ports do the same option does the same thing for remote-to-local port forwardings so that machines other than the SSH server machine can connect to the forwarded port. Note that this feature is only available in the SSH-2 protocol, and not all SSH-2 servers honour it in OpenSSH, for example, it s usually disabled by default.
You can also specify an IP address to listen on. Typically a Windows machine can be asked to listen on any single IP address in the 127.. . range, and all of these are loopback addresses available only to the local machine. So if you forward for example 127.0.0. to a remote machine s finger port, then you should be able to run commands such as finger fred 127.0.0.5. This can be useful if the program connecting to the forwarded port doesn t allow you to change the port number it uses. This feature is available for local-to-remote forwarded ports; SSH-1 is unable to support it for remote-to-local ports, while SSH-2 can support it in theory but servers will not necessarily cooperate.
Note that if you re using Windows XP Service Pack 2, you may need to obtain a fix from Microsoft in order to use addresses like 127.0.0.5 - see question A.7.20.
3.6 Making raw TCP connections
A lot of Internet protocols are composed of commands and responses in plain text. For example, SMTP the protocol used to transfer e-mail, NNTP the protocol used to transfer Usenet news, and HTTP the protocol used to serve Web pages all consist of commands in readable plain text.
Sometimes it can be useful to connect directly to one of these services and speak the protocol by hand, by typing protocol commands and watching the responses. On Unix machines, you can do this using the system s telnet command to connect to the right port number. For example, telnet mailserver.example.com 25 might enable you to talk directly to the SMTP service running on a mail server.
Although the Unix telnet program provides this functionality, the protocol being used is not really Telnet. Really there is no actual protocol at all; the bytes sent down the connection are exactly the ones you type, and the bytes shown on the screen are exactly the ones sent by the server. Unix telnet will attempt to detect or guess whether the service it is talking to is a real Telnet service or not; PuTTY prefers to be told for certain.
In order to make a debugging connection to a service of this type, you simply select the fourth protocol name, Raw, from the Protocol buttons in the Session configuration panel. See section 4.1.1. You can then enter a host name and a port number, and make the connection.
3.7 Connecting to a local serial line
PuTTY can connect directly to a local serial line as an alternative to making a network connection. In this mode, text typed into the PuTTY window will be sent straight out of your computer s serial port, and data received through that port will be displayed in the PuTTY window. You might use this mode, for example, if your serial port is connected to another computer which has a serial connection.
To make a connection of this type, simply select Serial from the Connection type radio buttons on the Session configuration panel see section 4.1.1. The Host Name and Port boxes will transform into Serial line and Speed, allowing you to specify which serial line to use if your computer has more than one and what speed baud rate to use when transferring data. For further configuration options data bits, stop bits, parity, flow control, you can use the Serial configuration panel see section 4.25.
After you start up PuTTY in serial mode, you might find that you have to make the first move, by sending some data out of the serial line in order to notify the device at the other end that someone is there for it to talk to. This probably depends on the device. If you start up a PuTTY serial session and nothing appears in the window, try pressing Return a few times and see if that helps.
A serial line provides no well defined means for one end of the connection to notify the other that the connection is finished. Therefore, PuTTY in serial mode will remain connected until you close the window using the close button.
3.8 The PuTTY command line
PuTTY can be made to do various things without user intervention by supplying command-line arguments e.g., from a command prompt window, or a Windows shortcut.
3.8.1 Starting a session from the command line
These options allow you to bypass the configuration window and launch straight into a session.
To start a connection to a server called host:
putty.exe -ssh -telnet -rlogin -raw user host
If this syntax is used, settings are taken from the Default Settings see section 4.1.2 ; user overrides these settings if supplied. Also, you can specify a protocol, which will override the default protocol see section 3.8.3.2.
For telnet sessions, the following alternative syntax is supported this makes PuTTY suitable for use as a URL handler for telnet URLs in web browsers :
putty.exe telnet://host :port /
In order to start an existing saved session called sessionname, use the -load option described in section 3.8.3.1.
putty.exe -load session name
3.8.2 -cleanup
If invoked with the -cleanup option, rather than running as normal, PuTTY will remove its registry entries and random seed file from the local machine after confirming with the user.
Note that on multi-user systems, -cleanup only removes registry entries and files associated with the currently logged-in user.
3.8.3 Standard command-line options
PuTTY and its associated tools support a range of command-line options, most of which are consistent across all the tools. This section lists the available options in all tools. Options which are specific to a particular tool are covered in the chapter about that tool.
3.8.3.1 -load: load a saved session
The -load option causes PuTTY to load configuration details out of a saved session. If these details include a host name, then this option is all you need to make PuTTY start a session.
You need double quotes around the session name if it contains spaces.
If you want to create a Windows shortcut to start a PuTTY saved session, this is the option you should use: your shortcut should call something like
d: path to putty.exe -load my session
Note that PuTTY itself supports an alternative form of this option, for backwards compatibility. If you execute putty sessionname it will have the same effect as putty -load sessionname. With the form, no double quotes are required, and the sign must be the very first thing on the command line. This form of the option is deprecated.
3.8.3.2 Selecting a protocol: -ssh, -telnet, -rlogin, -raw
To choose which protocol you want to connect with, you can use one of these options:
-ssh selects the SSH protocol.
-telnet selects the Telnet protocol.
-rlogin selects the Rlogin protocol.
-raw selects the raw protocol.
These options are not available in the file transfer tools PSCP and PSFTP which only work with the SSH protocol.
These options are equivalent to the protocol selection buttons in the Session panel of the PuTTY configuration box see section 4.1.1.
3.8.3.3 -v: increase verbosity
Most of the PuTTY tools can be made to tell you more about what they are doing by supplying the -v option. If you are having trouble when making a connection, or you re simply curious, you can turn this switch on and hope to find out more about what is happening.
3.8.3.4 -l: specify a login name
You can specify the user name to log in as on the remote server using the -l option. For example, plink login.example.com -l fred.
These options are equivalent to the username selection box in the Connection panel of the PuTTY configuration box see section 4.14.1.
3.8.3.5 -L, -R and -D: set up port forwardings
As well as setting up port forwardings in the PuTTY configuration see section 4.23, you can also set up forwardings on the command line. The command-line options work just like the ones in Unix ssh programs.
To forward a local port say 5110 to a remote destination say popserver.example.com port 110, you can write something like one of these:
putty -L 5110:popserver.example.com:110 -load mysession
plink mysession -L 5110:popserver.example.com:110
To forward a remote port to a local destination, just use the -R option instead of -L:
putty -R 5023:mytelnetserver.myhouse.org:23 -load mysession
plink mysession -R 5023:mytelnetserver.myhouse.org:23
To specify an IP address for the listening end of the tunnel, prepend it to the argument:
plink -L 127.0.0.:localhost:23 myhost
To set up SOCKS-based dynamic port forwarding on a local port, use the -D option. For this one you only have to pass the port number:
putty -D 4096 -load mysession
For general information on port forwarding, see section 3.5.
These options are not available in the file transfer tools PSCP and PSFTP.
3.8.3.6 -m: read a remote command or script from a file
The -m option performs a similar function to the Remote command box in the SSH panel of the PuTTY configuration box see section 4.18.1. However, the -m option expects to be given a local file name, and it will read a command from that file.
With some servers particularly Unix systems, you can even put multiple lines in this file and execute more than one command in sequence, or a whole shell script; but this is arguably an abuse, and cannot be expected to work on all servers. In particular, it is known not to work with certain embedded servers, such as Cisco routers.
This option is not available in the file transfer tools PSCP and PSFTP.
3.8.3.7 -P: specify a port number
The -P option is used to specify the port number to connect to. If you have a Telnet server running on port 9696 of a machine instead of port 23, for example:
putty -telnet -P 9696 host.name
plink -telnet -P 9696 host.name
Note that this option is more useful in Plink than in PuTTY, because in PuTTY you can write putty -telnet host.name 9696 in any case.
This option is equivalent to the port number control in the Session panel of the PuTTY configuration box see section 4.1.1.
3.8.3.8 -pw: specify a password
A simple way to automate a remote login is to supply your password on the command line. This is not recommended for reasons of security. If you possibly can, we recommend you set up public-key authentication instead. See chapter 8 for details.
Note that the -pw option only works when you are using the SSH protocol. Due to fundamental limitations of Telnet and Rlogin, these protocols do not support automated password authentication.
3.8.3.9 -agent and -noagent: control use of Pageant for authentication
The -agent option turns on SSH authentication using Pageant, and -noagent turns it off. These options are only meaningful if you are using SSH.
See chapter 9 for general information on Pageant.
These options are equivalent to the agent authentication checkbox in the Auth panel of the PuTTY configuration box see section 4.20.2.
3.8.3.10 -A and -a: control agent forwarding
The -A option turns on SSH agent forwarding, and -a turns it off. These options are only meaningful if you are using SSH.
See chapter 9 for general information on Pageant, and section 9.4 for information on agent forwarding. Note that there is a security risk involved with enabling this option; see section 9.5 for details.
These options are equivalent to the agent forwarding checkbox in the Auth panel of the PuTTY configuration box see section 4.20.5.
3.8.3.11 -X and -x: control X11 forwarding
The -X option turns on X11 forwarding in SSH, and -x turns it off. These options are only meaningful if you are using SSH.
For information on X11 forwarding, see section 3.4.
These options are equivalent to the X11 forwarding checkbox in the Tunnels panel of the PuTTY configuration box see section 4.22.
3.8.3.12 -t and -T: control pseudo-terminal allocation
The -t option ensures PuTTY attempts to allocate a pseudo-terminal at the server, and -T stops it from allocating one. These options are only meaningful if you are using SSH.
These options are equivalent to the Don t allocate a pseudo-terminal checkbox in the SSH panel of the PuTTY configuration box see section 4.21.1.
3.8.3.13 -N: suppress starting a shell or command
The -N option prevents PuTTY from attempting to start a shell or command on the remote server. You might want to use this option if you are only using the SSH connection for port forwarding, and your user account on the server does not have the ability to run a shell.
This feature is only available in SSH protocol version 2 since the version 1 protocol assumes you will always want to run a shell.
This option is equivalent to the Don t start a shell or command at all checkbox in the SSH panel of the PuTTY configuration box see section 4.18.2.
3.8.3.14 -nc: make a remote network connection in place of a remote shell or command
The -nc option prevents Plink or PuTTY from attempting to start a shell or command on the remote server. Instead, it will instruct the remote server to open a network connection to a host name and port number specified by you, and treat that network connection as if it were the main session.
You specify a host and port as an argument to the -nc option, with a colon separating the host name from the port number, like this:
plink host1.example.com -nc host2.example.com:1234
You might want to use this feature if you needed to make an SSH connection to a target host which you can only reach by going through a proxy host, and rather than using port forwarding you prefer to use the local proxy feature see section 4.15.1 for more about local proxies. In this situation you might select Local proxy type, set your local proxy command to be plink proxyhost -nc host: port, enter the target host name on the Session panel, and enter the directly reachable proxy host name on the Proxy panel.
This feature is only available in SSH protocol version 2 since the version 1 protocol assumes you will always want to run a shell. It is not available in the file transfer tools PSCP and PSFTP. It is available in PuTTY itself, although it is unlikely to be very useful in any tool other than Plink. Also, -nc uses the same server functionality as port forwarding, so it will not work if your server administrator has disabled port forwarding.
The option is named -nc after the Unix program nc, short for netcat. The command plink host1 -nc host2:port is very similar in functionality to plink host1 nc host2 port, which invokes nc on the server and tells it to connect to the specified destination. However, Plink s built-in -nc option does not depend on the nc program being installed on the server.
3.8.3.15 -C: enable compression
The -C option enables compression of the data sent across the network. This option is only meaningful if you are using SSH.
This option is equivalent to the Enable compression checkbox in the SSH panel of the PuTTY configuration box see section 4.18.3.
3.8.3.16 -1 and -2: specify an SSH protocol version
The -1 and -2 options force PuTTY to use version 1 or version 2 of the SSH protocol. These options are only meaningful if you are using SSH.
These options are equivalent to selecting your preferred SSH protocol version as 1 only or 2 only in the SSH panel of the PuTTY configuration box see section 4.18.4.
3.8.3.17 -4 and -6: specify an Internet protocol version
The -4 and -6 options force PuTTY to use the older Internet protocol IPv4 or the newer IPv6.
These options are equivalent to selecting your preferred Internet protocol version as IPv4 or IPv6 in the Connection panel of the PuTTY configuration box see section 4.13.4.
3.8.3.18 -i: specify an SSH private key
The -i option allows you to specify the name of a private key file in . PPK format which PuTTY will use to authenticate with the server. This option is only meaningful if you are using SSH.
For general information on public-key authentication, see chapter 8.
This option is equivalent to the Private key file for authentication box in the Auth panel of the PuTTY configuration box see section 4.20.7.
3.8.3.19 -pgpfp: display PGP key fingerprints
This option causes the PuTTY tools not to run as normal, but instead to display the fingerprints of the PuTTY PGP Master Keys, in order to aid with verifying new versions. See appendix E for more information.
If you want to provide feedback on this manual or on the PuTTY tools themselves, see the Feedback page.
PuTTY release 0.60.
Intro: The serial port - software setup. If you are trying to control something in the real world using your computer, the serial port is perhaps the easiest means of.
Usb Driver Motorola V365

You are at: Home Company motorola telephone-driver
DriverDownloadSites.com contains almost all kinds of drivers, here is the list of Motorola Telephone Driver available for Download. Just browse the driver categories below and find the drivers which you need. We add the newest drivers to our driver database everyday. So you can download the latest drivers from our site, If you has any Drivers Problem or need any help, Just Contact us, then we will contact you and help you resolve your Driver Problem.
It is very easy to download Motorola Telephone Driver. In order to download the latest Motorola Telephone Driver drivers, you should Download Our Driver Software of Driver Fetch. Then you can download and update drivers automaticlly and fix your computer driver problem easily. We are Professional Driver Company, ALL windows drivers are certified and tested by experts. Just Download and Do a free scan for your computer now.
Download Motorola Telephone Driver drivers for Windows 8, Windows 7, Windows XP. Just download motorola V330,V360,V361,V365,V400, drivers now.
Resolve webcam camera driver problems
Resolve modem driver problems
Resolve audio drivers problem
Resolve dvd cd drivers problems
Download Motorola Telephone Driver drivers for Windows 8, Windows 7, Windows XP. Just download motorola V635,V80,V975, drivers now.
Resolve scanner drivers problems
Download Motorola Telephone Driver drivers for Windows 8, Windows 7, Windows XP. Just download motorola MOTO RAZR maxx V6,MOTO RAZR V3,MOTO RAZR V3b,MOTO RAZR V3e,MOTO RAZR V3i, drivers now.

Modem DriverMP3 Player DriverNetwork DriverTelephone Driver PrevNext
Current page: 2 Total pages: 3 Total files: 104
This page contains the list of Motorola Telephone drivers available for free download. This list is updated weekly, so you can always download a new driver or update driver to the latest version here.
We offer Motorola Telephone drivers for Windows 8 32 bit / 64 bit, Windows 7 32 bit / 64 bit, Windows XP, Mac OS and Linux.
It is very easy to download Motorola Telephone driver. Just browse this list with Motorola Telephone models to find your device and click Download driver to see the page with all official Motorola drivers for your Telephone device. All driver downloads on Nodevice are free and unlimited, so you can update, restore, repair or fix your Windows system in few minutes. All Windows drivers are certified and tested by experts. If you can not find the driver for your Motorola Telephone please send us the driver request and we will try to find it for you.
Modem DriverMP3 Player DriverNetwork DriverTelephone DriverVendorModelCommentsOSDownload CDMotorolaV635Windows 2000 / Windows XPDownload PrevNext
Current page: 3 Total pages: 3 Total files: 104
Update the Motorola V365 Telephone Drivers For Windows 7 with ease. Easy Driver Pro makes getting the Official Motorola V365 Telephone Drivers For Windows 7 a.
CellCables.com Motorola V365 Package. Motorola OEM USB Data Cable with Motorola Phone Tools 4.0 Software CD. Packages will contain the following.
Update the Motorola V365 Telephone Drivers with ease. Easy Driver Pro makes getting the Official Motorola V365 Telephone Drivers a snap. Easy Driver Pro will.


Download Motorola V365 driver for Windows 2000 / Windows XP. To download Motorola V365 Telephone driver follow the instructions on the page.
Introducing your new Motorola V365 GSM wireless phone. software drivers are available in Motorola Original data kits, Motorola Original USB cable to the.
Ethernet Port Driver For Dell
Drivers Downloads. Identify your product. Our software is product specific. To ensure you get compatible files, Dell Recycling; Site Map.
DELL Dell Adapter USB 3 to Ethernet you to add an Ethernet port to your computer in driver for convenient setup. The Dell USB 3.0 to Ethernet.
This question has been answered by ewen9914
Hi, I hope someone can find a solution to this problem, I have to re-installed windows 7 on my DELL Xps 17 due to a problem with Mcafee Software. Thinking that I would resolve one problem I end up with another one bigger than the first one, so know I am missing my network controller driver which I can not find any ware. That is the only drive that I need for my wireless to work, and I am going a bit mad here try to find a solution, Any help will be greatly appreciated.
You have posted to a forum that requires a moderator to approve posts before they are publicly available.
As this is a very long thread and I have listed almost all Dell Wireless Cards hardware IDs and drivers in a wiki I will mark this as an answer so users can find the information they need at the top of the thread.
To find out the hardware IDs of Network Controllers and Hardware IDs in general follow the link:
For a list of Dell Wireless Cards, their hardware IDs and the latest driver I could find see here:
Intel Centrino Wireless-N 1030
Hardware IDs: PCI VEN_8086 DEV_008A PCI VEN_8086 DEV_008A SUBSYS_53258086 PCI VEN_8086 DEV_008A SUBSYS_53258086 REV_34 PCI VEN_8086 DEV_008A CC_028000 PCI VEN_8086 DEV_008A CC_0280
Vendor: Intel Driver 7 86, 7 64, 8.1 86,8.1 64: Intel PROSET Wireless Software Intel PROSet Wireless Bluetooth Software
i m lost my laptop latitude E4310 installation cd and can online download from which download online.
Network Controller is related to the Wireless card drivers. There are different XPS 17 computer models. If you can provide me the exact computer model I will able to provide the correct wireless card driver.
Also, please provide me the Device ID of the Network Controller; follow the instructions mentioned below to get the Device ID;
1 In Device manager, right click Network Controller.
4 Search for Device Instance ID.
5 Provide the numbers after VEN and DEV.
For any clarifications feel free to contact me.
This conversation is being saved in your Outlook Inbox folder.
To know more about Dell Product Support, Drivers Downloads, Order Dispatch status - choose your region US Customers; India Customers. For Dell Support videos click Here.
hi there I finally resolve the issue, 5 minutes ago, Intel Centrino Ultimate-N 6300, Centrino Advanced-N 6200, Centrino Wireless-N 1000, v.13.2.1.5, A00 inside the driver s folder iprodifx it did the job. Thanks anyway for your time and attention.
I am also facing the similar issue. My laptop model number is 1525. I am not able to see my network adapter. However, when i go under other devices:
i have these options with yellow exclamation mark.
Also under the sub of Display Adapters: Standard VGA Graphics Adapter is with yellow exclamation mark.
Reading your post i have searched the Device Instance Path: VEN_14E DEV_4315. Please kindly help me as of now my internet is not connecting.
You can download the drivers for your computer from the links below:
Select For Single File Download via Browser.
Save the driver on your desktop.
Once the driver is downloaded on the desktop, right click on it and select Run as administrator.
Follow the prompts on screen and restart your computer.
To know more about Dell s products, services and drivers downloads, please go here
Thanxz Chinmay for you reply. I have already downloaded all the drivers which you linked me the wireless link each time i run the file it gives me an error of the operation system is not supported the software will not be installed. Setup will now exit. I have done everything according to your instructions still i have Network Controller with yellow exclamation mark and Video Controller and lastly Standard VGA Graphics adapter despite the fact, i downloaded all the driver and ran it as administrative each time after successfully installation restarted the laptop. Once again my laptop in inspiron 1525 window vista, inten pentium dual core inside. Kindly, help me resolve this issue of network so i can get my internet.
All the drivers above are compatible with Windows Vista 32 bit Operating System. May I know since how long you been facing this issue. Also, In order to assist you in a better way, I would need the Service Tag of your computer.
I have added you as a friend. Please accept my friend request by clicking on my name highlighted in blue and then click on Friends tab at the top and then click on Request to Review and finally click on Accept button.
I am sending you a private message as well. Click on Inbox to respond to the message and provide system s Service Tag and contact details so I may access your system records and check for further course of action. You could also click on Start Conversation to send a private message.
Please reply with information.
The computer model is XPS 17 L702x I have installed the Gigabit LAN Realtek RTL8111E Gigabit Ethernet Controller Driver from the Dell wesite. Now I notice that even though have resolved the issue that I had in the first place now it takes longer to identify a public network when before the computer didn t have such a problem, any thoughts on that
1 In Device manager, right click Network Controller.
4 Search for Hardware ID
5 Provide the numbers after VEN and DEV.
Provide the same for Network Controllers and Video Controller
Mark my answer as resolved if your issue is resolved
I have checked my Device Manager and under Network adapters I have the following devises installed:
I have checked my Decive Manager and under Network Adapters this is what I have installed, I don t know if these are the drivers for the model I have XPS 17 L702x, I just installed the driver that are for my system on the Dell website:
PCI VEN_8086 DEV_0083 SUBSYS_13258086 REV_00
PCI VEN_8086 DEV_0083 SUBSYS_13258086
PCI VEN_8086 DEV_0083 CC_028000
Microsoft Virtual WiFi Miniport Adapter: This is the same as Number 2, I think I have installed the same drivers twice I don t know
5d624f94-8850-40c3-a3fa-a4fd2080baf3 vwifimp
Realtek PCIe GBE Family Controller:
PCI VEN_10EC DEV_8168 SUBSYS_04B71028 REV_06
PCI VEN_10EC DEV_8168 SUBSYS_04B71028
PCI VEN_10EC DEV_8168 CC_020000
I hope this helps, my apologies for my poor understanding of the issue.
Sorry, the mistake is on my part :
Same problem here. I am in tears. The laptop is a Dell Latitude E5430. It is brand new refurb. Following the instructions in the solutions I see here, the numbers are: PCI VEN_14E4 DEV_4727 SUBSYS_00151028 REV_01 4 67996F5 0 00E1.
I have downloaded the drivers onto my other Dell laptop and all were installed perfectly except for the Network Controller. Please help me or I will have to return the equipment as it is useless to me in this condition.
Forgot to mention the OS is Windows 7, 64bit.
i m too facing the same problem, recently i installed win _64bit in my Dell Vostro 1550 laptop. After that i m not able to connect to internet. it is showing that driver is not installed.
Various devices and their hardware IDs are as follows:
Hardware IDs: USB VID_0A5C PID_21D7 REV_0112
Hardware IDs: PCI VEN_14E4 DEV_4365 SUBSYS_00161028 REV_01
PCI VEN_14E4 DEV_4365 SUBSYS_00161028
PCI VEN_14E4 DEV_4365 CC_028000
PCI simple Communication Controller:
Hardware IDs: PCI VEN_8086 DEV_1c3a subsys_05081028 rev_04
PCI VEN_8086 DEV_1c3a subsys_05081028
PCI VEN_8086 DEV_1c3a CC_078000
Thanks for your reply, i already tried to install your first mentioned driver, but is it showing that This self-extracting zip file is part of a multidisk zip file. please insert the last disk of the set.
I downloaded that from dell-India s website.
Let me try one more time, the driver provided by you then only i can are they useful for me or not.
You may install the drivers from the links below:
veejdeej: Thank you for assisting the customer.
Veejdeep: Thanks buddy for your help, 2 out of that 3 problem get resolved. but still i have problem with Network Controller. Driver that i downloaded from first link provided by you, after installing shows that, Installation is not proper, I tried 3 times but each time same problem.
Chinmay S: Thanks for your intervention, but the i m not able to download from the link, provided by you.
each time, when i Click on the link, it opens in a new window and after clicking on that download button, there is no response.
Yellow exclamation mark on Network controller indicates that driver for wireless card of your computer needs to be installed. If you know the make and model of wireless card, you may share that. If you are unable to find any information regarding this, you may private message me the service tag of computer. I have added you as a friend. Please accept my friend request by clicking on my name highlighted in blue and then click on Friends tab at the top and then click on Request to Review and finally click on Accept button.
Thank you for the information.
I have received the service tag of your computer. Your computer is shipped with Dell Wireless 1704 card. I was not able to locate the driver for Vostro 1550. However, I found driver for another computer, that might work. You may install driver for wireless card from link:
Please ensure that you uninstall the current driver of wireless card If any, then install the driver from the link above.
A very thanks to you, finally I get relief from that WiFi card problem, after installing that driver provided by u, now it s working very fine.
If there is any problem in future then i ll do contact you.
I am glad that the issue is resolved.
Please feel free to get in touch in case you have any further questions.
que puedo hacer para solucionar este problemaa
Just re installed windows on my laptop and I wasn t sure which drivers I was supposed to install and came across this. In device manager under the other devices tab there is:
PCI simple communications controller
Please share the system model and operating system installed.
You might need to install the chipset, video and the wireless card drivers for your computer. You may follow the steps below:
Enter the Service Tag of your system and select the operating system.
Select the category like chipset, video and click on the driver available.
Download and install the drivers by following onscreen instructions.
If the issue persists, you may send me the system service tag via private message click my username and then click Start Conversation.
I installed the drivers following those steps and it was starting to fix things such as my internet, but the next time I went to turn my laptop on, instead of loading windows is said invalid partition table and now I can t login.
Edit: Uh never mind, when I removed the usb with the drivers on it from my computer, windows started up. Also, when I entered my service tag it had 27 drivers I could install but I only installed the 7 from chipset, video and network. Should I download the other ones. I noticed that things like the turbo boost icon don t pop up when I turn my computer on like they used to.
In order to provide you the direct links for the drivers that needs to be installed on your computer, I would need the service tag of your computer. You may send me the system information via private message click my username and then click Start Conversation.
Hi, I have a similar problem. After a blue screen crash I reinstalled Windows 7 on my Vostro 3750 and cannot connect to the internet as several drivers are missing. I called the Dell helpline and, after the telephone line got cut a couple of times, finally got to speak to someone in IT who helped me locate 2 drivers I d need, R294380 and YPYJF and then, before I could install them, the call cut again. I ve been round in circles with this so many times, can anyone help. I seem to have installed the networikk driver OK R294380 so that the adapter is working but I still have yellow triangles against all my driver files and can t connect to the internet even via cable. I m not sure how to install the YPYJF wifi driver but have tried pointing everything to the parent folder via the device manager and nothing is picking it up. Any advice greatly appreciated, 2 days into this and I m still not much further on and Dell s 902 phonelines I m in Spain don t seem capable of holiding a call for more than a few minutes.
In Device manager what are the. marks showing under other devices,Try enabling the Wifi using Fn F2 or Wireless switch and let us know the Status on Device manager. Double click on the Network Controller with. or. Assume it shows under Other devices. go to details tab - Change the drop down to Hardware ID - Post the info given below in the box. We can find the driver based on the info.
Hi Veejdeej, thanks very much for the response. Fortunately I was able to get through to technical support again and get the drivers needed to get the wifi up and running again, however I still have several drivers missing all listed under Other Devices with. :
PCI Simple Communications Controller
Unknown Device - Hardware ID: ACPI SMO88 00
Unknown Device - Hardware ID: USB VID_138A PID_0011 REV_0078
As the internet is now working fine, I m not sure what, if any, impact the lack of these is having on PC performance - I m still reloading software lost after I reinstalled Windows 7 Pro to try and get back to the funcionality I had before.
One thing that I have lost is the fingerprint recognition software. I managed to find a link to the driver, but when I tried to install it it said that other necessary files were missing, so I presume I need to do a complete reinstallation of the software. Do you know how where I can get this.
SMBus: ftp.dell.com//R292605.exe
Unknown Device1: ftp.dell.com//R292744.exe
USB 3.0 Driver: ftp.dell.com//R299161.exe
Card Reader: ftp.dell.com//R294157.exe
Unknown Device2: ftp.dell.com//R292686.exe - Validity Sensor - Fingerprint
TouchPad drivers for Multitouch: ftp.dell.com//R301431.exe
Audio Drivers: ftp.dell.com//R297834.exe
QuickSet App: ftp.dell.com//R299707.exe
Additional drivers given for better functionality - All drivers above are for Vostro 3750 - Windows 7 64 bit.
Visit ftp.dell.com//vostro-3750.html for accessing other Win XP/Win 8 drivers for Vostro 3750
Thanks so much for providing the links to these drivers. I ve installed them all on my Vostro 3750 Windows Pro 64 bit and all have worked, except:
It is still staying it cannot find the drivers for this device, even after I ve done the installation, and the fingerprint software still doesn t work. Any ideas on how I can resolve this greatly appreciated.
p.s. could it be that I need to download the fingerprint software again first before I install the driver. I don t know where I can obtain the software.
On my original order it is liseted as Palmrest: Fingerprint Reader Biometric
you should have got the resource cd or drivers and utilities disk from dell which would contain the drivers and application. Or you can download them from or go to the last link in my previous post and download ST Microelectronics DE351DL Motion Sensor drivers. If you still see unknown driver then right click on it and choose update driver then choose download or search from internet and download.
The final link solved the driver problems, thanks. The fingerprint reader still isn t working though I don t get the option to swipe instead of enter my password when I restart the PC. I didn t get a software disk so I can t reload the software from it. I tried the smartsource link but when I click the button to register my computer nothing happens. I ve now registered it through a dell account, but is there another link I can try to download the software.
I was having the same problem with my dell m5010. I installed all of the optional win 7 updates and when the laptop rebooted the network controller installed itself. Hope this works for you
Rt click on the Internet explorer thru C: Program Files X86 Internet Explorer iexplore.exe and choose run as Administrator and then go to https://smartsource.dell.com and then try Register button, then click Install SysProf or something would come This would fetch your service tag from your computer to register. You can see the softwares that were shipped along with the computer. Thru this you can get webcam central, Mcafee and Fingerprint as well i think. Please check.
Thanks. I was able to reinstall the software following these instructions, although after setting up the fingerprint reader with my fingerprint, it doesn t give me the option to swipe to start Windows like it used to and I have to manually enter my password when I restart my PC. So, although I now have the driver and the software, it doesn t appear to be functional. Any idea why.
I believe I m experiencing same problem like many people out there. I see Network Controller on Other Devices list and it has yellow exclamation mark next to it which means I need drivers.
My Network controller Hardware Ids:
PCI VEN_8086 DEV_008A SUBSYS_53258086 REV_34
PCI VEN_8086 DEV_008A SUBSYS_53258086
PCI VEN_8086 DEV_008A CC_028000
Device Instance Path couldn t find ID so posting this, maybe helpful too :
PCI VEN_8086 DEV_008A SUBSYS_53258086 REV_34 4CEB42FFFF7241C900
I didn t mention, but I have DELL Inspiron N5110 15R
This an Intel Centrino Wireless-N1030 card.
Mark as resolved if this works for you.
I m using Windows 7 64-bit and I ve tried to install the driver you mentioned above before and it didn t work.
I mean, it still shows that yellow exclamation mark next to Network Controller.
I am glad that worked for you. Rejoice with your Dell.. :
Hello, I need help with network controller. ID of hardware:
PCI VEN_14E4 DEV_4365 SUBSYS_00161028 REV_01
PLEASE HELP :X my wifi doesnt work. I have dell inspiron 17r 3721 with windows 8 64bit. Problem started when I have uninstalled dw dwlan card utility because I had problem with it, but after installing drivers that are avaible on dell website it still doesnt work System doesnt see WIFI CARD, I have no idea what I can do Please help me.
This is a 1704 Dell Wifi BT Driver
Win 7: ftp.dell.com//Network_Driver_3WJ6F_WN_WLAN-6.20.55.5_A03.EXE
Win 8 no 64bit drivers available in support dell for DW 1704. DW 1703 is only available: ftp.dell.com//Network_Driver_2CRMP_WN_WLAN--10.0.0.2_A02.EXE
Suggest you to try the above link for Win 8 as well. If it doesnt click then run in Compatibility mode Win 7.
Also you can check in your HDD. Under C: Dell Drivers 3WJ6F or Network or wireless, you can get the setup file and install. Provided re-installation of OS was not done.
Please help me : Brand new Inspiron 3721, installed every driver but the wifi driver fails to install. Windows 8 Pro 64 bit. I m now using a external wifi adapter and that s ridiculous for a new laptop. Barnii2 how did you solve your problem. Please
ok after trying several drivers one solved the problem I think it was the 1704 for windows 7 link given by veerdeej above. It is so disappointing that I spent the whole evening with trial and error instead of doing work on my new dell laptop. Why are the drivers for my support tag incompatible and I had to find the answer in a forum. I m not buying dell again, so disappointed
ansaarkhan_6 : Provide the model number and operating system 64 bit or 32 bit. What is the exact problem you are facing. Provide the HArdware ID details from the previous thread.
i have these options with yellow exclamation mark.
Reading your post i have searched the Device Instance Path: VEN_14E DEV_4315. Please kindly help me as of now my internet is not connecting.
You may install the drivers from the link below:
For installation of drivers is correct order, you may refer to link:
You may check the wireless card shipped with your computer from system configuration webpage, under Original system configuration Tab. You can click on the link:
Once you get to know the wireless card, you may install the appropriate driver from Drivers and Downloads tab.
I had to reinstall operating system and now i canot see wifi card and bluetooth icon in right side bottom try. when i try to install software from dell website, it say compatible hardware not missing.
Dell E5430, Win 7 professional 64X
please let me know if further degails are needed.
This package provides driver for Dell Wireless WLAN 1540 Half MiniCard and is supported on Latitude E6 series and Precision Mx700 series..
iI downloaded this driver from drivers and download option and than run the installation. It took 15 min for the installation to complete but after that my wifi was ON.
it didnt work you give me a windows xp system software and i have a vista home premium
my bad some of them work now i need:
if you need more information plz let me know
You may download and install the drivers for Windows Vista from the links below:
In case you are not able to find the wireless card from the steps given in previous post. You may private message me the service tag of your computer. I have added you as a friend. Please accept my friend request by clicking on my name highlighted in blue and then click on Friends tab at the top and then click on Request to Review and finally click on Accept button.
Niel: I am glad that the issue is resolved. Please feel free to get in touch in case you have any further questions. I ll be glad to assist.
Hello All, I m pretty much having the smae issue you guys are having,
I reinstalled my operating system Windows 7 - 64 bit on my Studio 1558 laptop. I installed all the drivers but there are two drivers keep showing up on my device manager with an exclamation point.
- Network Controller Unknown Device
HELP. I can t get on the internet :
my zinox pc has network controller and vga problem after installing new windows 7,pls help
Your computer is shipped with Dell Wireless 1397 card. You may download the driver for your computer from link:
Khow123: You need to install the wireless driver for your computer. For unknown device, you may try installing the ST Microelectronics driver from link:
To install the correct driver for your wireless card, you need to check the wireless card shipped with your computer from system configuration webpage. You can click on the link: Enter the service tag Under Original system configuration Tab check wireless card shipped with your computer and install the appropriate driver.
In case the issue persists, you may provide me the hardware ID of the device for which driver needs to be re-installed. You may access the hardware ID by following the steps below:
Open Device manager -- Right click on the device with yellow exclamation or red cross -- Properties -- Then select Details tab. Select Hardware ID by expanding the Device description Drop down menu.
jnwosu36: I have a limited knowledge about the third party system manufacturers. If you get a yellow exclamation mark in Device manager on Network controller wireless and Display adapter Video card, you might need to re-install drivers for same. You may install drivers for same from the system manufacturer s website.
Please reply for further clarifications.
I have an Inspiron N5030 and just replaced the hard drive. I didn t have any of the original disks so I ran the Dell recovery and restore USB key. Now my computer won t connect to wireless router. I have windows 7. Checking the device manager, I have 2 issues. One is mobile intel R 45 express chipset family and the other is network controller. I probably need downloads for these but can t figure out how to get them to my computer that can t connect to the internet. Need help.
VEN 14E4 and DEV 4315 is for the wireless card installed on your computer.
VEN 8086 and DEV 2930 is for the chipset drivers.
Did you try installing the drivers from the previous reply. If yes, do you get any error message.
peterson9934: Usually Dell computers are shipped with a Drivers and utilities disc. You may install the drivers using that disc. In case you are not able to locate that disc, you may visit a public library or may use a friend s internet connection to download the relevant drivers for your computer. Once done, save the drivers on any USB storage device like USB External hard drive or memory stick. Plug that USB storage device to your Inspiron computer and install the drivers by following onscreen instructions.
You may download the chipset driver from link:
In reference to wireless drivers, Inspiron N5030 is shipped with the following WLAN cards:
Atheros AR9285 802.11 b/g/n WiFi card
You may check the wireless card shipped with your computer from system configuration webpage, under Original system configuration Tab. Here is the link: Enter the service tag to access details.
yea i did and it was downloaded and it didnt show any errors the only one i need now is network controller
hey i have the same problem my laptop is inpiron n5110 windows 7 32-bit. please help me
You may download the wireless driver for your computer from link:
In case you get any error while installation of driver, please share the exact error message and screen shot of same.
felito14: Do you get yellow exclamation mark in Device Manager. If yes, please share the device with yellow exclamation mark. If you need assistance with wireless driver installation, You may private message me the service tag of your computer.
it doesnt show any errors but what im going to do is to fromat the computer again and try everything again
Thanks to all for the help. Got sick of trying to fix it and took it somewhere to get fixed. Cost me 55. It was something to do with the manufacturer of the driver and it wasn t dell. Pretty easy fix for someone who knows what they are doing I guess.
Did you try installing the driver from the link above.
If you are not able to install the driver on your computer, you may download the set up file right click and run as administrator Extract the driver and make a note of the path where the drivers are extracted.
Usually the drivers are extracted to C:Dell/drivers/
Navigate to the folder where the driver is extracted and then right click the set up file. Select Run as an Administrator and see if it works.
In case you are trying to re-install operating system, ensure to back up all the data from computer as this step leads to complete data loss. For detailed steps on operating system re-installation, you may refer to link:
Once the operating system is re-installed, you may download and install the drivers on your computer. You may download the drivers from the link:
To know more about the installation of drivers in correct order, you may refer to link:
dear i have many problem with driver as below :
It appears that Wireless card, Ethernet card and Chipset drivers are missing. Please share the system model and operating system 64bit or 32bit installed. I ll check for the correct set of drivers for you.
Please reply with the information.
To know more about Dell Product Support, Drivers Downloads, Order Dispatch status - choose your region USA; India. For helpful Dell Support Videos, you may click Here.
Please feel free to get in touch in case you have any further questions. I ll be glad to assist.
I have the same problem tooreinstalled Windows 7 and drivers are lost.
PCI VEN_8086 DEV_1E3A SUBSYS_05581028 REV_04
PCI VEN_8086 DEV_1E3A SUBSYS_05581028
PCI VEN_8086 DEV_1E3A CC_078000
PCI VEN_8086 DEV_1E22 SUBSYS_05581028 REV_04
PCI VEN_8086 DEV_1E22 SUBSYS_05581028
PCI VEN_8086 DEV_1E22 CC_0C0500
It appears that the Chipset and the Wireless drivers are missing. Please install the below mentioned drivers and share the results:
Realtek USB 2.0 Card Reader Driver:
Hope this helps. Please reply with the results.
I have a laptop of DELL. .Model No. 3521-9878 Inspiron 3521, Dell service tag :GHTJ8W1..I am facing problem in wifi, And I tried to install the Network controller as given by you and failed do so.. please suggest.
ADMIN NOTE: Email id removed per privacy policy
I understand that you tried the steps which I shared in my last response, the reason it failed is because the drivers shared are for Dell 1704 Wireless Card and your system is shipped with Dell 1703 Wireless Card. Please share the operating system installed and also a screenshot of Device Manager with Network Adapters and Other Devices expanded. Here are the steps:
Press the key combination Windows Logo key R key to open Run dialog box.
Type in devmgmt.msc and click OK.
The Device Manager windows will appear.
Click on the sign next to Network Adapters and Other Devices to expand it.
Please reply with the information, will take it further from there. Also, please remove the service tag from public view for security reasons.
i get below error when i try to install Dell Wi-Fi BT Driver:
06/07/13 :38 Update Package Execution Started
06/07/13 :38 Original command line: C: Users admin Downloads Network_Driver_6J4VN_WN_WIFI6.20.55.51_A02.EXE
06/07/13 :38 DUP Framework EXE Version: 3.0.93.1
06/07/13 :38 DUP Release: 6J4VNX00-00
06/07/13 :38 Intializing framework
06/07/13 :40 User Command: attended
06/07/13 :40 DUP Capabilities Value: 39845887 0x25FFFFF
06/07/13 :40 DUP Vendor Software Version: WIFI:6.20.55.51,BT:6.5.1.3303
06/07/13 :40 Local System/Model Compatible with this Package. Yes
06/07/13 :40 Local System OS Version: 6.1.0.0
06/07/13 :40 OS Compatible with this Package. Yes
06/07/13 :40 Local System OS Language: EN
06/07/13 :40 Language Compatible with this Package. Yes
06/07/13 :40 DupAPI::ExtractPayloadTo : Extraction Error: 9
06/07/13 :40 Identified Behavior : attended
06/07/13 :40 Name of Exit Code: ERROR
06/07/13 :40 Exit Code set to: 1 0x1
06/07/13 :42 Open file: C: ProgramData Dell UpdatePackage Log Network_Driver_6J4VN_WN_WIFI6.20.55.51_A02.txt
Please try installing the following drivers and check if it resolves the issue for you:
Please share the results, also share if the PCI Simple Communications Controller and SM Bus Controller drivers are working correctly or not.
its fixed now. i had uninstalled the existing lenovo bluetooth drivers and installed the above one.
I m delighted to hear that. Feel free to reach out in case you have any questions in the future.
0082 SUBSYS_13218086 REV_34 4 F7DAF43
Please share the system model and operating system installed. The Hardware ID that you have shared is not complete. Also, share the screenshot of the Device Manager with the Network Adapters and Other Devices expanded. Here are the steps:
Also, share the Hardware Ids of the device which has a bang in the Device Manager, this will assist me to identify device and its drivers. Here are the steps:
Select your device and right click on it.
Click Properties from the drop down list.
Click Details and then click Device description button to select Hardware Ids.
Share the Hardware Ids mentioned under Value.
Please try installing the below drivers and check if the issue is resolved or not.
hi, got the same problem after the Intel wireless driver on my laptop was uninstalled.
Device Instance ID: PCI VEN_8086 DEV_0887 SUBSYS_44628086 REV_C4 4 20F6FC50 0 00E1
any advice gratefully received, cheers Lee
You would need Intel Centrino Wireless-N 2230 wireless card driver for the Device ID you have provided. Please let me know the Operating system installed on your system so that I could provide you the correct driver.
hi ravi, the OS is Windows 7 Home Premium Version:6.1, Build:7601, Service Pack 1
I m having difficulties installing the network controller on my Dell latitude E5430 with OS Windows 7.
It appears that the drivers for Intel Centrino Advanced-N 6205 card are missing. Please try downloading and installing the below mentioned drivers:
Hope this helps. Also, please remove the service tag from public view for security reasons.
Please reply with the results.
You can download and install the Intel Centrino Wireless-N 2230 wireless card driver from the link below.
Please let me know if this helps.
What do I do with the VEN and DEV numbers.
The VEN and DEV numbers are the part of Hardware IDs which help us to identify the device installed and its Vendor. Please let me know if you are facing any issue, I ll be glad to assist.
problem in network controller.
details are given for inspiron N4010
PCI VEN_8086 DEV_0083 SUBSYS_13258086 REV_00 4 1D3C4AA9 0 00E1
Win 7 X64 bit: ftp.dell.com//R278714.exe
Win Vista X64 bit: ftp.dell.com//R278711.exe
Driver for Intel N 1000 Wireless controller
hi there, im having the same issue, after my motherboard fried, i had to reinstall windows approx 6 months ago, i cannot even view a host, adapter, or anything else to my gigibit ethernet driver, and would prefer to have lan, i can run the computer wifi but would prefer not to i have tried all available downloads and none of them work they keep telling me to plug in a card before using the adapter.
Please provide the Vendor ID and Device ID from the device manager and a screenshot of your device manager to let you know what driver to install. Mention you System Model, 32 or 64 bit and Which version of Windows to help you better.
Also, share the screenshot of the Device Manager with the Network Adapters and Other Devices expanded. Here are the steps:
The Device Managerwindows will appear.
Click Propertiesfrom the drop down list.
Please reply with the information to help you better
To assist you further with the drivers, please post the operating system installed in the computer and share the screen shot of the Hardware Ids.
Open Device manager window, select the Other device, right click Network Controller listed under Other devices, click Properties, select Details tab, click the dropdown menu under Property and select Hardware Ids, please take a screen shot and post it in the reply, so that I can search for the right drivers.
Please provide your system model and Operating system.
You can enter your service tag at support.dell.com and go to the section drivers and downloads, Under the section Network - Download the driver for Centrino Advanced-N 6205 Wifi Card. That should do the trick.
Please someone help. I have had to reinstall windows on my dell and I now cannot find the wireless drivers.
Service Tag: ADMIN NOTE: Service tag removed per privacy policy
Under Other devices I have a yellow question mark against network controller and have the below numbers under the details tab Hardware ID
PCI VEN_8086 DEV_0082 SUBSYS_13218086 REV_34
PCI VEN_8086 DEV_0082 SUBSYS_13218086
PCI VEN_8086 DEV_0082 CC_028000
Please help me get the drivers for my wireless card.
Download the Dell driver: ftp.dell.com//Network_Driver_540F3_WN_15.03.1000.1637_A03.EXE
This is the driver for your Intel Centrino 6205 Wireless card.
Please do not post the service tag in a Public forum. Provide it in a private conversation only to a Dell employee.
I have an Dell Inspiron14 3421 model non touch.
In have Win 7 64 bit Enterprise OS on it .
I am not able to get the drivers for the Network Controller.
PCI VEN_168C DEV_0036 SUBSYS_020C1028 REV_01
PCI VEN_168C DEV_0036 SUBSYS_020C1028
PCI VEN_168C DEV_0036 CC_028000
Thanks for the link. Wifi now works. sorry about the service tag
hroohani: You are welcome, glad that sorted out all the. marks on Device manager page.
Suggest you to install the Quickset App, Other Apps under Application, Touchpad Drivers, USB 3.0 Drivers, Card Reader drivers to utilize the full potential of your laptop from the support site, after entering the service tag in the support.dell.com -- Drivers and downloads.
Based on your model number there is a Touch version only. And based on your vendor ID details, I can see that its Atheros adapter. But your system would have been shipped with either Dell Wireless 1703 802.11b/g/n or Dell Wireless 1704 802.11b/g/n as per support site. Did you make any hardware or software changes.
I did not make any hardware changes. The laptop was shipped with Win 8 and I downgraded it to WIn 7 OS.
These are the Laptop details :-
from the Specs, it looks like it has a Dell Wireless. . please help me with the link to the correct driver
I tried both these drivers, but none of them worked.
Dell inspiron 3421 is shipped with following wireless cards:
1703 WiFi Bluetooth 4.0 Half Mini Card
1704 WiFi Bluetooth 4.0 Half Mini Card
Intel 2230 WiFi Bluetooth 4.0 Half Mini Card
Reviewing the Hardware ID shared by you it appears that your system was shipped with Dell Wireless DW1704 card, so first try updating this driver and then try updating the Dell Wireless DW1703 drivers.
Hope this helps. Please reply if you have any questions.
I AM HAVING A ETHERNET CONTROLLER PROBLEM IT IS SAYING IT CANNOT LOCATE THE ETHERNET CONTROLLER HARDWARE. i HAVE NO INTERNET CONNECTION AND IT IS DRIVING ME CRAZY. i HAVE A Dell Penium 4 operating system is windows xp if anyone can HELP i would greatly appreciate it.
Please share the exact System Model. Also, share the screenshot of the Device Manager with the Network Adapters and Other Devices expanded. Here are the steps:
Type in devmgmt.msc and click OK.
Share the Hardware Ids of the device which has a bang in the Device Manager, this will assist me to identify device and its drivers. Here are the steps:
Click Details and then click Device description button to select Hardware Ids.
Please reply with the information. I ll be happy to assist further.
I have done a clean install of Win8 on a Inspiron 3721. When I try to install the Win8 64 bit wireless driver that is recommended from the downloads for the service tag for that machine, it fails at the point where it says to turn on Bluetooth with the switch. I have tried every driver I can find. NOTHING WORKS.
Suggest you to download the drivers from below mentioned link.
downloadcenter.intel.com/confirm.aspx
Open the link and choose I agree radio button, This will download the driver. Copy this driver to a storage device like memory stick / external hard drive and then run and install it on the target PC. Hope that helps..
When I go to device manager it has a yellow question mark next to it when i go to ethernet controller properites and details the Device Instance id says
PCI VEN_8086 DEV_1039 SUBSYS_01421028 REV_81 4 3B1CAF2B
Try installing Quickset application from Application category in Drivers and downloads, restart PC.
Please press F2 key on the keyboard to enable BT and Wireless, after which try to install the drivers. If you still have trouble finding the drivers, request you to provide the Hardware ID Steps provided by DELL-Saharsh K that can help me to get the correct drivers for your system.
The radio is always turned on. I tried turning it off and on again when I get to that step. No go. I will have the machine in my office tomorrow and get the ID for you.
i pressed F2 and the options i have are
Sequoya22: The above mentioned steps - Try installing Quickset application from Application category in Drivers and downloads, restart PC.
are meant for StartingToHateDellAfterBeingACustomerFor25Years. Looks like a mis-communication. My apologies,
Sequoya22: Please click on the link mentioned above in the previous posts Intel site and choose I agree to download the drivers.
This is the Dell provided driver for your Hardware ID. Request you not to type your service tag in the forum. Please edit your post and remove the service tag.
You need to install Intel 10/100 Network Drivers. You may download the drivers from the link Download the driver and follow the onscreen instructions to install it. Also, please remove the service tag from public view for security reasons.
in the previous page saharsh had posted the links for dell wireless 1704 or 1703 drivers. These are the drivers for your device. Hope that helps.
According to the download page, these are for different models and for Win7. To wit:
This package provides the Dell Wireless DW1703 802.11b/g/n, BT4.0 HS Driver and is supported on Inspiron N5040/N5050/N4050/M4040/M5040 and Vostro 1540/1550/V1450/V1440 models that are running the following Windows Operating System: Windows 7.
I need the drivers for the Inspiron 3721 for Win8
NOPE. NOPE. and NOPE. Neither of these worked. Seriously, how hard can this be. I sent you the hardware IDs. Let me say it once again: Inspiron 3721 and Windows 8 64 bit. Are you telling me I have a special Dell Inspiron that can never use Windows 8 AND wireless.
Do I need to crack the case and look for identifying marks on the chips. This should be basic stuff. Wireless LAN driver for Inspiron 3721 with Windows 8 64 bit. Is there any way I can further clarify this. I ve been through every driver that can be downloaded for this machine and the last ones you suggested that are for neither this machine or Windows 8.
Anything. I have a machine that is of very limited use without wireless capability. I can t believe that this is posing such a problem to find the right drivers. Did the IDs not give you enough information to definitively identify the chipset and find the correct drivers. I have tried at least 8 different drivers that I ve downloaded from links in this thread. This is in addition to the driver from the download page that is recommended based on the service tag.
When this machine came to us with Win7, the wireless worked, so this is not defective or malfunctioning hardware.
This needs to be resolved. This machine will be out in the field away from wired networks. If this can t be resolved, we will return the machine and purchase a HP. This should be a simple matter.
Again, no. The install fails with a big red X. Every. Single. Driver. That. Has. Been. Suggested. Fails.
How is it that, given the service tag CCHP2X1, the hardware IDs for the controller PCI VEN_168C DEV_0036 SUBSYS_020C1028 REV_01
PCI VEN_168C DEV_0036 CC_0280,
it is still not possible to provide the right driver.
I have the same problem with my Inspiron N5050, would you please provide the drivers for:
PCI VEN_14E4 DEV_4365 SUBSYS_00161028 REV_01 4 64CB39 0 00E3
USB VID_0A5C PID_21D7 C01885E3ECA4
PCI VEN_8086 DEV_0106 SUBSYS_05041028 REV_09 3 11583659 0 10
Network Controller - Dell Wireless 1704 - ftp.dell.com//DW1704_W7_A00_Setup-F042R_ZPE.exe
BCM43142A0 Same as above - Bluetooth
Video: Intel HD Driver - ftp.dell.com//Vedio_Intel_W84_X00_A01_Setup-5PFY2_ZPE.exe
Drivers as per your system model shows in support site.
1703/1705 DW - www.dell.com//inspiron-17-3721
1704 Dell Wireless BT - www.dell.com//inspiron-17-3721
If you further need help - Add Saharsh Dell as a friend and send him a private IM - en.community.dell.com//default.aspx
I having the same problem as above.. lost my network drivers after I put in a new hard drive..Please help. Sorry my name is George.
To assist you further, please post the system model and operating system installed in it.
This is a insperation 560 Admin Note: Removed Service Tag as per Privacy Policy 64 bit with windows 7. I have the driver disk that came with my computer but the network driver will not install, so i went to the web site and tried to install the driver but it would not take also. Thankyou.
After the operating system is installed in the new hard drive, the drivers should be installed in correct order for proper functionality of the hardware components of the computer. Please use this link which shows the right order:
While following the order mentioned above in the link, install the Network card drivers from here:
MIssing my network controller driver after re-installed windows 7
To assist you further, please provide the system model.
Also, I suggest you to copy the drivers on a Disk or a flash drive by following the below mentioned steps from a different computer and install the drivers from the Disk/USB flash drive in the laptop:
Visit the following website in a different computer:
Enter the Service tag of the system which has network problem in the box provided and click Submit.
In the next page, click drop down arrow to select the Operating System which is installed in the computer.
Select the Network drivers accordingly from the list and click Download File and save the file on desktop.
Copy all the files from the desktop into Disk/USB flash drive.
Insert the Disk/USB flash drive in system which is having a network problem and install the drivers.
Run the downloaded file and restart the system.
Try connecting to the internet after installing the drivers and post the results.
My dell N5030, windows 7 ultimate 32 bit also have the same problem.It does not detecting the wifi.And shows as the network controller is not installed.
Link: ftp.dell.com//R299167.exe
Atheros Wifi Driver for your system
I m having the exact same problem. I have a Latitude E6430 with Windows 7 32-bit installed. The Network Controller has the following values:
When I put in my service tag, it suggested that I install the Intel WIDI application WIDI 3.5.40.0.A03, but I received an install abort error during the install. The error message was This platform is not compatible with Intel R WIDI or application is in use.
I would like to get the Network controller driver installed so I can use my wireless connection.
Refer the following link to install drivers for 6205 WLAN card:
Select Download file and follow the onscreen instructions to complete the installation.
Restart the computer and try connecting to Wireless network.
I went to that link and downloaded the 6205 WLAN card driver. It installed without any problem. I restarted my computer and still no connection to Wireless networks. I also confirmed that the NETWORK CONTROLLER is still needing a driver from my Device Manager.
I also noticed that this 6205 WLAN card driver indicates its for a 64 bit Windows 7 OS. I have installed a 32 bit Windows 7 OS, could that be the problem. Any other suggestions would be appreciated.
With the information you provided, I was able to find a driver by searching the Dell site. The correct driver that worked for me was located at www.dell.com//DriverDetails. Thanks.
Thank you so much VEEJDEEJ. . Problem Solved. .
My Dell Inspiron Duo is also suffering the same problem after a reinstall of Windows. I have a yellow exclamation mark after the Network Controller in Device Manager and another entry underneath which says Unknown device - also with yellow exclamation mark.
I have downloaded the three drivers R283212, R283215, and R297914 on another computer, and have attempted to reinstall via USB. There is no CD/DVD drive on this model.
One is for an ethernet connector, and will not install as the Dell Inspiron Duo does not have a port for an ethernet cable.
One is for the Broadcom BCM4313 WLAN Combo Card Driver, and this will not install - No compatible hardware found. The software you are attempting to install is not supported on this system ; and
The last one is for the Atheros driver, and it goes all through the installation, and then tells me in a little dialogue bubble from the wi-fi icon in the system tray that the software has not been installed.
The numbers for the Network controller are VEN_14E4 DEV_4727
My Service Tag is redacted. The computer was bought in Hungary sometime last year, though I am in the UK. I reinstalled Win7 Home Premium SP1 two days ago, and have had this problem ever since.
Please share whether you have installed Windows 7 32 bit or 64 bit version. Also, share the screenshot of the Device Manager with Network Controller and Other Devices expanded. The Hardware ID shared by you is for Broadcom BCM5787M 802.11g Network Adapter. Please share the Hardware ID of all the devices which has yellow bang in Device Manager. I will review the details and assist you install the correct drivers. Also, please share the Owner s Name with me via private message for me to verify the account information click my username and then click Start Conversation.
Also, remove the service tag from public view for security reasons. Please reply with the information, I ll be happy to assist further.
Thank you for your reply. It is a 32-bit system, sorry. I have sorted out the unknown device entry accelerometer.
Screenshot can be seen here: Sorry, the file size was too big, so I couldn t put it here. In case you cannot click on an external link, I can tell you that under Other devices there is only Network Controller with the yellow exclamation mark. There is no separate entry for Network Controller, other than this.
PCI VEN_14E4 DEV_4727 SUBSYS_00101028 REV_01
PCI VEN_14E4 DEV_4727 SUBSYS_00101028
PCI VEN_14E4 DEV_4727 CC028000
Ignore this message - I cannot delete it
Hi, I also have the same problem. Installed Win 7 Ultimate 64bit and the wifi is not working.
I logged in with my service tag and downloaded lots of drivers, but it is not working.
Hardware IDs for Network Controller:
PCI VEN_168C DEV_002B SUBSYS_02051028 REV_01PCI VEN_168C DEV_002B SUBSYS_02051028
PCI VEN_168C DEV_002B CC_028000
Would be glad for some help. :
I am replying on behalf of Saharsh. I am sending you a private message. Please reply with the required information.
To know more about Dell s Product Support, Drivers Downloads, Orders Dispatch status - choose your region USA, India. For Dell Support Videos, click Here.
It is a Dell Wireless 1702 802.11 b/g/n, BT3.0 HS device.
Install and restart computer should work now. Please confirm if it worked for you.
Thanks for the help. It is not working though. Just realized that there are more exclamation marks showing up in the Device Manager. We need to fix them as well. : Maybe I should post the Hardware ID:s for them.
It appears that the Chipset, Video and Wireless drivers are missing. Please install the below mentioned drivers in the order which they are given:
Hope this helps. Keep me posted with the results.
i have also facing the same problem
Please share the exact system model and the operating system installed. Also, share the screen shot of the Device Manager for me to identify which drivers you need. Here are the steps to access Device Manager:
Also, share the Hardware Ids of the device which has a yellow bang in the Device Manager, this will assist me to identify device and its drivers. Here are the steps:
Please reply with the information, I ll be happy to assist you.
Glad to know that the issue is resolved. Feel free to reach out to us if you need any assistance in future.
No compatible hardware, again. I did not change anything on the computer.
This might be a hardware issue. Seems like the wireless card is not getting detected by the system. You may try re-seating the wireless card. Please refer the Service Manual
I have same issue and tried provided solution but no luck.
I have paid to DELL to send me a recovery USB, but no luck and dell also sent me Windows CD, no luck.
Can someone please help. PCI card adaptor drivers are missing and can t install from drivers CD and also on the PCI card properties, I have noticed that MANUFACTURER is defaulted as UNKNOWN.is that an issue and if YES why it is not reading the MFG name.
Please share the exact system model and operating system installed. Also share the screenshot of the Device Manager with Network Adapters and Other Devices expanded. Here are the steps:
Press the key combination of Windows Logo key R key to open Run dialog box.
Click on the sign next to Other Devices and expand it.
Please reply with the information, I ll be happy to assist you further.
PCI VEN_8086 DEV_0083 SUBSYS_13258086 REV_00 PCI VEN_8086 DEV_0083 SUBSYS_13258086 PCI VEN_8086 DEV_0083 CC_028000 PCI VEN_8086 DEV_0083 CC_0280
The above Device ID was for Intel Centrino Wireless-N 1000 card.
To install the drivers for the same, please click this link:
Please let me know how it goes.
I too am facing this problem.The network controller has a yellow exclamation mark.Also,the vga grahpics adapter shows the mark and the usb 2.0
My laptop model is Dell inspiron 14 3421,im using windows 7 ultimate 64 bit
Please help as soon as possible.Its a brand new laptop.. :
Please try the below mentioned steps:
Enter the service tag of the system, and select Drivers and Downloads tab.
Select the operating system from the dropdown, and install the drivers for Chipset, Video, and Network accordingly.
You may also follow the steps from the following link to download the missing drivers for the devices in Device manager:
Please reply for any further help.
Thanks for the reply Nikhil and sorry for the insufficient info
Here are the problems with their idscan you please give me the drivers.
PCI VEN_10DE DEV_0FE1 SUBSYS_05B21028 REV_A1
PCI VEN_10DE DEV_0FE1 SUBSYS_05B21028
PCI VEN_10DE DEV_0FE1 CC_030000
USB VID_0BDA PID_0129 REV_3960
Thank you for your reply.The wifi and the usb drivers worked fine but as for the graphics driver,I m getting a message You must install an intel driver first when checking for system compatibility the first step during the installation.
Also,I have two more problems.
1 When i press fn 2, the wireless button, the light the wireless light in my laptop does not go on or off always stays off but my wireless works fine.Why is that so.
2 I have no option to set the brightness of my monitor in the control panel the brightness slider isn t there and the fn keys don t work
Can you please give me the solutions.Thanks.
Please use these links to install the drivers for Intel HD graphics:
Restart the system after installing the drivers and check the functionality.
I have installed both the things now.Still,the wireless indication light never comes on if i use fn 2. but it does turn the wifi off or on..maybe the problem is with the light
I also have a serious doubt - why do i have Intel HD graphics adapter when i had ordered for Nvidia Geforce GT730M/2GB GDDR3. Have i been cheated.
It shows in the display properties that my adapter type is intel hd graphics 4000.I even have the geforce sticker stuck on my laptop.
I bought my laptop using this link.
After Intel HD video card drivers are installed, have you tried installing Drivers for Nvidia Geforce GT730M.
If not, please use this link to install NVidia Graphics driver:
Restart the computer after the driver is installed and check in Device manager if the Nvidia Geforce GT730M is detected under Display adapters:
Click Start. Right click My computer.
Click Manage and select Device Manager.
On the Device Manager window, expand Display adapters or Other devices.
Check if the card is detected.
I have a Vostro V131 and I need the network controller driver and PCI Simple Comm. Controller.
PCI VEN_8086 DEV_008A SUBSYS_53258086 Driver
Make sure you install Intel HD Graphics driver and without restarting install the nvidia drivers in order to use the switchable graphics.
I have the same laptop as Candel and i have the same problem but my laptop s OS is windows7 32 bits, i do have ethernet controller driver installed but under other devices i have 3X Base System Device that are not installed.
PLZ help as i cant connect to the internet with this laptop. i check out the links u posted here but is seems like they are XP and Vista Competable.
Dell Inspiron 1525 model was tested with Windows XP and Vista. Hence, Windows 7 drivers are not available for this system. However, I am sharing the drivers for Windows Vista 32Bit version. Try installing them and check if they work. If the issue still persists, try installing the drivers in compatibility mode. Below are the drivers:
Below are the steps to install the drivers in compatibility mode:
Click on the link shared above and download the drivers on the desktop.
Double click on the file and extract it on the desktop in a folder.
Look for setup file in the extracted folder. Right click . exe file and click Properties.
Click install in compatibility mode.
Click on Application and select Troubleshoot Compatibility.
Next, click on Troubleshoot Program.
Click on Program worked in earlier versions of Windows.
Do not hit Next until the installation completes.
Once the installation completes, click on Next.
Hope this helps. If the issue still persist you might have to rollback to the previous version of the Windows Installed on the system.
Needing some help on this issue as well. It s for an Inspiron One 2320, Windows 7 Home Premium 64 bit. Device ID s:
PCI VEN_8086 DEV_0091 SUBSYS_52218086 REV_34
PCI VEN_8086 DEV_0091 SUBSYS_52218086
PCI VEN_8086 DEV_0091 CC_028000
PCI VEN_8086 DEV_1C22 SUBSYS_05111028 REV_05
PCI VEN_8086 DEV_1C22 SUBSYS_05111028
PCI VEN_8086 DEV_1C22 CC_0C0500
I have the service tag available upon request. Thanks in advance.
Thanks for the quick reply Saharsh,
The first and second installed fine and worked for the SM Bus, but when I installed the third I got the following error: This product cannot support downgrading from version 2.1.1.0153 to version 1.1.0.0537. Please uninstall the product and try again or contact the product vendor. I still have the exclamation point over the network controller.
I m not familiar with which product it is referring to.
Please try and update the drivers using the Intel Auto Driver Detect Utility.
Hope this helps. Please share the results.
The Auto Driver Detect wasn t able to discover the driver. Gave an error saying it wasn t recognized or not supported. BUT- there was an option to visit the Intel Download Center to look through generic drivers, located at https://downloadcenter.intel.com/default.aspx. Using my service tag, I went back to Dell.com to find out the name of the chipset that my system was shipped with Intel Centrino Advanced-N 6230. Found it using the dropboxes and downloaded the software it recommended. That did the trick and I am squared away. Thank you for the assistance, I wouldn t have found the website without your suggestions.
Hello I also just reinstalled my sons laptop to factory settings which was going well until I tried to install the network drivers. the AR8151 installed but the intel wifi link 1501 sits on pc but doesn t give the option to run please can you help
PCI VEN_14E4 DEV_1691 SUBSYS_043B1028 REV_01
PCI VEN_14E4 DEV_1691 SUBSYS_043B1028
PCI VEN_14E4 DEV_1691 CC_020000
Broadcom NetLink TM Gigabit Ethernet
----------------------------------------------------------------------------------
Wireless Driver - Win 7 - Atheros Wireless 1525 WLAN Mini Card Desktops if you need
Can you post the hardware ID of the one listed with question mark.
In Intel Wifi you dont have 1501 you have only Dell WLAN 1501.
post your system model and operating system.
PCI VEN_14E4 DEV_4727 subsys_00101028 REV_01
System Model and Operating System X86 or X64 - Please mention that.
This is a Dell Wireless 1501 WLAN Wireless N Half Mini Card
Link for Downloading Win 7 and Vista Driver - CXW91
I tried installing the network controller driver but it says its not compatible hardware found its not supported on the system What do I do help dont have network adapter driver. .
I solve this problem with this file: Network_Driver_G9X9G_WN_WLAN_10.0.0.59_A04
pci ven_168 dev_002a subsys_0203168c rev_01 4 5157cef 0 0048
You have missed a C; it should be PCI VEN_168C DEV_002A SUBSYS_0203168C
The Vendor is Atheros it is a AR9280 otherwise known as a Dell Wireless 1525 WLAN card.
The latest Dell Driver I can find for it is for Windows 7 32/64 Bit:
A later driver is found in the Unoffiicial Atheros website:
Installation of the later driver has to be done via the Device Manager.
I am also facing the same issue, My network controller driver is missing and it has a yellow exclamation in the device manager. Following your suggestions, I checked on the device Instance ID - VEN_14E4 DEV_4727.
It is a DELL INSPIRON N5010 with Windows 7 Home Premium.
Can you let me know how to resolve this.
Should be the Dell Wireless 1501 or 1520 card on the Inspiron N5010 model.
The hardware ID for the 1501 card should be:
I installed Dell Wireless 1501 card and I am able to see the network driver. However I am not able to connect to the internet. The error shows Diagnostics Service policy is not running. When I try to start the Diagnostic Service Policy, it says Windows could not start the diagnostic policy service on Local COmputer. Error 5: Access is denied. Also, the Diagnostic Service Host and Diagnostic System Host are also not started. The start option is greyed disabled on both.
i have the same problems and the number i get are PCI VEN_14E4 DEV_1692 SUBSYS_04001028
go to start, search and type:- cmd, right click on returned cmd.exe and select run as administrator at the prompt type:-
net localgroup Administrators /add networkservice
net localgroup Administrators /add localservice
press enter and restart your computer
Open services and make sure the service is started.
Pl provide your system model and operating system, Win 7 or WIn8 or Win 8.1, 64 bit or 32 bit to provide the download link.
The ethernet card is Broadcom NetLink TM Gigabit Ethernet.
The best way is to go to support.dell.com type your Service Tag and download the drivers from the list, since those are the specific drivers for your PC
i actually wonder everyone had such a hard time with drivers
Operating System and Model of Dell.
bro i too lost my lan and wirless drivers by re installing windows 7.dell inspiron n5110 plz help mesoon
My laptop has the same problems, and have been recently formatted.
First is that the desktop is sort of like in the safe mode with enlarged text.
Also I have those yello exclamation marks over
Please I need your expertise help because I have no file back-up and would really like to keep my files.
Please provide hardware IDs as there are variations of wireless card and also video card in that model:
Install the drivers only in this order for better functionality.
Intel HD Graphics - X64 Win7 8 -
IDT Audio Driver - Win7 X64 and X86
Inter Rapid Storage Technology Driver -
After every driver installation its advised to restart the computer
Network Controller - For the wireless card we need the hardware ID as shown in this link - as it varies from system to system.
I have same problem with network controller after I have installed Win 7 64
PCI VEN_168C DEV_0036 SUBSYS_020C1028 REV_01 4 2CA06353 0 00E3
Hardware IDs: PCI VEN_168C DEV_0036 PCI VEN_168C DEV_0036 SUBSYS_020C1028 REV_01 PCI VEN_168C DEV_0036 SUBSYS_020C1028 PCI VEN_168C DEV_0036 CC_028000 PCI VEN_168C DEV_0036 CC_0280 Vendor: Atheros AR956x
Driver 7 86, 7 64: 10.0.0.260
Driver 8.1 86, 8.1 64: 10.0.0.278 Unofficial Czech Atheros Driver Website
I have sort of the same issue. Recently had to reinstall Windows Vista on my wife s Dell Inspiron 1525 laptop due to a virus. The reinstall went OK, but I can t connect to the web. From what I can see in the Device Manager under Other devices the Network controller has a yellow triangle with a . on it, I m guessing that s the issue. When I go under the Network Controller s property tab details the device ID has VEN_14E4 DEV_4315 SUBSYS_000B1028 REV_01 4 B04E914 0 00E1 any help would be greatly appreciated
That is the Dell Wireless 1395 card.
Before installing the drivers make sure you have Windows Vista Service Pack 1 and Service Pack 2 installed.
After the OS update you need to install the Drivers in the correct order, starting with Dell System Software and then the Intel Chipset The drivers can be downloaded from here using your computer and saving to a USB flash drive:
For more details on driver installation see here:
Note the example is given for Windows 8.1 and is slightly different but not much.
Thanks for your help suggestions. I did what you mentioned in the above post, but I m still at the same stage as I was before with no web connection. I installed both service packs, the Dell System Software then the Intel Chipset drivers but nothing changed. Please excuse me as I am not that great when it comes to computers, I know a little but that s pretty much it. Any other suggestions
I think I may have fixed the issue, I just DL d then installed this Dell Wireless 1395 WLAN MiniCard, v.4.170.77.3 Driver ; 4.170.77.13 Application, A20
THANKS AGAIN. If I still have problems with the web connect I will be back, hopefully not though
Yes sir. Thanks again for putting me on the right track it s extremely appreciated
i want help i cant conect to network or bluetooth devicesor wireless on my dell inspiron 17 the VEN:168 and dev:0036
PCI VEN_168C DEV_0036 PCI VEN_168C DEV_0036 SUBSYS_020C1028 REV_01 PCI VEN_168C DEV_0036 SUBSYS_020C1028 PCI VEN_168C DEV_0036 CC_028000 PCI VEN_168C DEV_0036 CC_0280 Vendor: Atheros AR956x
I have a similar problem. I can not connect to the internet after reinstalling Vista. I m not sure what drivers I need to install and in what order. I have Dell Latitude E6420. I am running Windows Vista Home Premium. I installed Vista 2 as per instructions provided in one of the earlier posts. The hardware IDs for the missing Devices are below. Please help. Thank you.
USB VID_0A5C PID_5800 REV_0101 MI_00
PCI VEN_8086 DEV_1502 SUBSYS_04931028 REV_04
PCI VEN_8086 DEV_1502 SUBSYS_04931028
PCI VEN_8086 DEV_1502 CC_020000
PCI VEN_1217 DEV_8231 SUBSYS_04931028 REV_03
PCI VEN_1217 DEV_8231 SUBSYS_04931028
PCI VEN_1217 DEV_8231 CC_018000
PCI VEN_8086 DEV_1C3D SUBSYS_04931028 REV_04
PCI VEN_8086 DEV_1C3D SUBSYS_04931028
PCI VEN_8086 DEV_1C3D CC_070002
PCI VEN_8086 DEV_1C3A SUBSYS_04931028 REV_04
PCI VEN_8086 DEV_1C3A SUBSYS_04931028
PCI VEN_8086 DEV_1C3A CC_078000
PCI VEN_8086 DEV_1C22 SUBSYS_04931028 REV_04
PCI VEN_8086 DEV_1C22 SUBSYS_04931028
Dell System Software Windows Vista:
Unknown Device ACPI SMO8800 SMO8800
SM Bus Controller PCI VEN_8086 DEV_1C22 SUBSYS_04931028 REV_04 PCI VEN_8086 DEV_1C22 SUBSYS_04931028 PCI VEN_8086 DEV_1C22 CC_0C0500 PCI VEN_8086 DEV_1C22 CC_0C05
PCI Serial Port PCI VEN_8086 DEV_1C3D SUBSYS_04931028 REV_04 PCI VEN_8086 DEV_1C3D SUBSYS_04931028 PCI VEN_8086 DEV_1C3D CC_070002 PCI VEN_8086 DEV_1C3D CC_0700
PCI Simple Communications Controller PCI VEN_8086 DEV_1C3A SUBSYS_04931028 REV_04 PCI VEN_8086 DEV_1C3A SUBSYS_04931028 PCI VEN_8086 DEV_1C3A CC_078000 PCI VEN_8086 DEV_1C3A CC_0780
Intel Management Engine Interface:
Mass Storage Controller PCI VEN_1217 DEV_8231 SUBSYS_04931028 REV_03 PCI VEN_1217 DEV_8231 SUBSYS_04931028 PCI VEN_1217 DEV_8231 CC_018000 PCI VEN_1217 DEV_8231 CC_0180
Intel Rapid Storage Technology Applciation:
Ethernet Controller PCI VEN_8086 DEV_1502 SUBSYS_04931028 REV_04 PCI VEN_8086 DEV_1502 SUBSYS_04931028 PCI VEN_8086 DEV_1502 CC_020000 PCI VEN_8086 DEV_1502 CC_0200
Network Controller PCI VEN_8086 DEV_0082 SUBSYS_13218086 REV_34 PCI VEN_8086 DEV_0082 SUBSYS_13218086 PCI VEN_8086 DEV_0082 CC_028000 PCI VEN_8086 DEV_0082 CC_0280
Intel Centrino Advanced N6205 64 Bit:
Intel Centrino Advanced N6205 32 Bit:
Broadcom USH USB VID_0A5C PID_5800 REV_0101 MI_00 USB VID_0A5C PID_5800 MI_00
ControlPoint Security Device Driver Pack 64 Bit:
ControlPoint Security Device Driver Pack 32 Bit:
ControlPoint System Application 64 Bit:
ControlPoint System Application 32 Bit:
Also you need the video drivers but there are variants specify the hardware IDs under Display Adapters.
Thank you so much for the response. I forgot to mention that it was Vista 32 bit. Does that change what I need to instal.
You indicated that I need to install two items for Dell System Windows Vista. One link was for 62 bit and the other 32 bit. Do I intall both or is it one or the other depending on the Vista I installed.
I will get back to you with the Video Drivers.
Ignore the 64 Bit version of DSS and the drivers I have marked as 64 Bit. Most of the installers cover both the 32 Bit and 32 Bit architecture so I haven t mentioned 32 Bit or 64 Bit for these.
I uploaded the drivers ignoring the ones for 64 bit but when I checked Device Manger under Other Devices I still did not have the Ethernet Controller. Below is the hardware ID:
During the installtion of one of the drivers - i don t remember which one but I received the following: Micrsoft Windows: Dell Update intel Intel R Wifi Link 6300 Intel R WIFI link 6250, Intel R wifi link 6205, intel R wife link has stopped working.
i m not sure if the message above is related to not having successfully downloaded the Ethernet controller. Also don t know if it s related to other internet errors.
I was able to connect to the wireless internet as the system was able to detect the network. However, when I tried to use internet explorer I get the following error mssage: Internet Explorer cannot open the Internet site. Operation Aborted. If I try to type in an address directly I can get to the site but then the message pops up and closes the internet page
I ve also received these messages Show Firmware updgrade reminder stopped working and was closed
The system also provided me with a solution to my problem
1 Fingerprint reader is missing a device - security D_A12_R20283.exe. I downloaded this, i m not sure if I should have installed it.
2 ST Micro Screen Detection isn t compatiable with this version of windows. I didn t know what to do with this message.
Also, I received a notice that I was using an outdated internet explorer. I tried to download but received this message InternetExplorer 8 not compatible
You had also asked about the Display adapters - here they are.
PCI VEN_8086 DEV_0126 SUBSYS_04931028 REV_09
PCI VEN_8086 DEV_0126 SUBSYS_04931028
PCI VEN_8086 DEV_0126 CC_030000
I hope this isn t too cryptic. Look forward to hearing back from you And hopefully a solution to the internet issue.
I found newer Dell specific drivers for PCI VEN_168C DEV_002A SUBSYS_0203168C:
DW1502_Dell_W7_A02_Setup-9DTVV_ZPE.exe Dell Wireless 1502 LAN driver version 9.2.0.517 for 32bit/64bit Win7; but also supports the DW1525 card
Network_Driver_TKPT6_WN_10.0.0.227_A01.EXE Dell WiFi / Bluetooth Driver - DW1601 version 10.0.0.227 for 32bit/64bit Win7; also worked with the DW1525 card
try installing either one as I m currently using version 9.2.0.517 for the DW1525 WLAN card on my family s Dell Inspiron 620 desktop computer.
hi can you please help me with this problem.. it seems i have tried downloading all i can get to solve this problem but it seems not working.. please help me
Thank you for responding. I should have included that I have windows vista 32 bit. noticed that you had posted links for windows 7.
I am not sure if I can/should download something for windows 7 when I have vista 32 bit.
ALso. I am not sure what you meant by you have missed a c I really don t have a good grasp at what I m doing here so you re help is really appreciated.
Also, not too sure how these posts work and if you can easily read the first post and subsequent messages or if I should repeat info. For example I have Dell Latitude E6420.
I look forward to your response and what i need to do to get my computer working.
Thanks I hadn t even listed the 1601 card and have updated the driver for the 1502.
Did version 10.0.0.268 of the 1601 card work for you.
Try this for the free fall sensor although the other one I listed was supposed to be Vista compatible:
Ensure that the drivers extract and install and not just extract see here for details:
Please provide the hardware Ids and the system model e.g. Inspiron 5537. H61M-DS2 refers to the chipset not the Dell model no. See here for instructions on how to do this:
Also if you have manually installed Windows 7 see Windows Reinstallation Guide/A Clean Install of Windows 7:
Note if you are unsure about the model no, private message me the service tag and I will check the system configuration.
Thanks for the tip on installing the drivers. I had while I was installing the last batch that the ethernet driver file would extract but wouln t install. I will try it next week as I m on vacation now.
Thank you so much for all your help. Very much appreciated.
Makes sense the driver extracted but did not install. Its actually quite a common problem which Dell don t seem to notice regarding their drivers. Its why I highlighted in in that screenrecording video. Enjoy your vacation and post back the results when you are ready. :
Haven t tried out the 10.0.0.268 driver from Dell but I m sure it ll work with the DW1525 card. Version 9.2.0.517 worked but got occasional connection drops with the DW1525 card. I m avoiding the unofficial Atheros WLAN drivers from Atheros.cz or any other site because the INF files there do NOT support the DW1525 card. device ID subsys 0203168C are not even listed on the INF files from many of those recent Atheros WLAN drivers, so I will stick with Dell specific ones from the Dell web site.
I recently updated the driver to version 10.0.0.270 from the Network_Driver_Dell_A01_W732W764-SETUP_ZPE.exe file for Windows 7 only.
I seem to have best of luck with either the latest 8.0.x, 9.1.x, or 10.0.x driver versions with no dropped connections with the DW1525 card.
Did the installer work for you natively or did you have to update manually via the Device Manager.
Back from vacation and pleased to report that the computer is up and running. The tip on how to install the drivers was really useful. It happened twice - where I had to manually go into the set up file.
Thanks again for all of your help. It was really appreciated. I don t know how I would have gotten the computer to work without your help and this forum.
Great I m glad to hear that you got your system back up and running. :
I cannot download the drivers because I can t get on the network. I ordered the driver CD from Dell but I don t think it should be this hard to tell which driver I am missing. What is the driver called that is the network adapter for Inspiron N5050, Service Tag H14WKR1.
I cannot download the drivers because I can t get on the network. I ordered the driver CD from Dell but I don t think it should be this hard to tell which driver I am missing. What is the driver called that is the network adapter for Inspiron N5050.
That tag only gives 4 drivers in Drivers and Downloads omitting most the drivers that you need.
You need the Dell Wireless 1503 Card Drivers.
Driver 7 86, 7 64: 5.100.82.34
plz help me with my network controller problem, I can t access my internet through Wifi because the driver of wifi isn t installed or isn t working correctly, plz help me
Its impossible to help you with no information about your system model, version of Windows and hardware IDs:
Seems no one responded to your post. Was wandering if you managed to resolve the issue. am having same problem. Cant find the driver for the WIFI card and getting Network Controller issue.
Kindly help if you resolved please.
This is an 18 page thread there are plenty of replies.
Provide the model of your system e.g. Inspiron 6400, version of Windows e.g. Windows 7 64 Bit and hardware IDs which are used to identify variants such as wireless cards within models. See here for information:
Intel Centrino Wireless-N WiMAX 6150
Hardware IDs: PCI VEN_8086 DEV_0885 PCI VEN_8086 DEV_0885 SUBSYS_13058086 Vendor: Intel Driver 7 86, 7 64, 8.1 86,8.1 64: Intel PROSET Wireless Software Intel PROSet Wireless Bluetooth Software
The above links appear to be brokendownloads aren t completed for me.
What links. This is a very long thread.
How to I find out which network adapter I have so that I can download the correct driver. When I click on the the network controller and attemp to view the properties the only thing it tells me is that it is an unknown device and the drivers are not properly installed.
Oooohhhh i got it. Disregard previous post.
sir..i m using dell inspiron 15-3521i m having error in Network controller and portal device..i m not able to connect my data card in laptop..plz reply for this to my mail sir.
when i was following above instruction, i dont find the device instance id in details tab what i do and how can i search this
Detailed steps on how to get vendor ID and device ID is mentioned here:
State you Operating system. Is it Windows 7 or Windows 8.
Also provide the vendor ID and device ID, by following the given link
PCI VEN_168C DEV_0032 SUBSYS_E044105B REV_01
PCI VEN_168C DEV_0032 SUBSYS_E044105B
PCI VEN_168C DEV_0032 CC_028000
You need to search in SONY website for the drivers.
Hint: Atheros AR5xxx/AR9xxx Series Wireless LAN Driver
I m experiencing same problem like many people out there. I see Network Controller on Other Devices list and it has yellow exclamation mark next to it which means I need drivers.
Operating System : Windows 7 service Pack1 32 bit
Laptop Model No : Dell XPS L 702 X
Service Tag no: : Service tag removed as per privacy policy
PCI VEN_8086 DEV_008A SUBSYS_53258086 REV_34 4 34D4683 0 00E1
NATAKUC4 thanks it sorted out my problem
My Friend is also experiencing same problem like many people out there. I see Network Controller on Other Devices list and it has yellow exclamation mark next to it which means I need drivers.
Operating System : Windows 7 64 bit
Laptop Model No : Dell INSPIRON 3421
PCI VEN_14E4 DEV_4365 SUBSYS_00161028 REV_01 4 1D6924F0 0 00E2
Service Tag removed per privacy policy by Philip Yip
That s the Dell Wireless 1704 card, try this driver:
Dell Wireless 1704 – 802.11n BT4.0
Hardware IDs: PCI VEN_14E4 DEV_4365 PCI VEN_14E4 DEV_4365 SUBSYS_00161028 REV_01 PCI VEN_14E4 DEV_4365 SUBSYS_00161028 PCI VEN_14E4 DEV_4365 CC_028000 PCI VEN_14E4 DEV_4365 CC_0280 usb vid_0a5c pid_21d7 Vendor: Broadcom Driver 7 86, 7 64: 6.30.223.99 Driver 8.1 86, 8.1 64:
NATAKUC4 thanks it started working
Great, thanks for posting back to let me know. :
HI I am having the same problem for my Dell laptop Inspiron 5520.
I think accidentally i uninstalled some programs from my computer and now i am facing the problem with
my Wireless network adapter. I am not able to find my wireless network adapter under device manger list.
I have following adapters under network adapters
Bluetooth Device Personal Area Network
Bluetooth Device RFCOMM Protocol TDI
Realtek PCIe FE FAmily Controller
Remote NDIS Based Internet Sharing Device
Network controler Showing Yellow mark
USB2.0-CRW Showing Yellow Mark
I tried several ways by downloading network adapters from Dell website.
But nothing seems to be worked.
Please some one advise if i can use any of the above network adapters installed on my machine to connect to wireless network WIFI
Please advise if i need to install any driver specifically.
Please advise the exact driver name or Software name to use wifi on my machine as usually.
I have been trying this from last one week.
the driver worked for my laptop inspiron 5520
I have a dell latitude E5430 I cannot connect to the internet, error message network adapter do not install. I need help I try some many ways in my own no resolve
Under Other devices in Device Manager - Which devices have a yellow. Question mark.
Provide the Operating system in order to assist you better.
Are you trying to connect using Wired / Wireless.
Provide the Vendor ID and Device ID so that I can help you get the exact driver.
we need wifi network controller dreiver for inspiron 15 3000 windows 7 32 bit
pci ven_8086 dev_0083 subsys_13268086
pci ven_8086 dev_0084 subsys_12168086
pci ven_8086 dev_0084 subsys_13168086
pci ven_8086 dev_0083 subsys_13068086
pci ven_8086 dev_0083 subsys_12268086
pci ven_8086 dev_0083 subsys_12068086
Driver 7 86, 7 64, 8.1 86,8.1 64: Intel PROSET Wireless Software Intel PROSet Wireless Bluetooth Software
pci ven_8086 dev_0084 subsys_13158086
pci ven_8086 dev_0083 subsys_13258086
pci ven_8086 dev_0084 subsys_12158086
pci ven_8086 dev_0083 subsys_12058086
pci ven_8086 dev_0083 subsys_12258086
pci ven_8086 dev_0083 subsys_13058086
I am having issues with my wireless card also. I have a Dell 1745 on Vista 64bit I removed the 5100 AGN and replaced with 5150 Device manager does not have driver for Other Device - Newtork Controller, I tried many different drivers, not seem to find the network controller.
PCI VEN_8086 DEV_423C SUBSYS_13018086 REV_00 PCI VEN_8086 DEV_423C SUBSYS_13018086 PCI VEN_8086 DEV_423C CC_028000 PCI VEN_8086 DEV_423C CC_0280
12110A2A-BBCC-418b-B9F4-76099D720767 BPMP_8086_0180
my network controller drive installed in my divice
my network controller is not updathing
Need Drivers for Dell Inspiron 3543 windows 7 64bit for network and Ethernet adopters.
PCI VEN_10EC DEV_8136 SUBSYS_06551028 REV_07
PCI VEN_10EC DEV_8136 SUBSYS_06551028
PCI VEN_10EC DEV_8136 CC_020000
Windows 7 64 bit. Drivers needed.
Philip s website with all the drivers and hardware IDs is a GODSEND. THANK YOU.
I ve got a brand new Dell XPS 8700 and NONE of the drivers listed for the service tag work for either the wireless OR bluetooth. And the autodetect wants me to install AMD drivers for my nVidia card. Yeah right.
I m glad someone else is on top of this stuff. Dell obviously isn t.
Kindly provide me the drivers for my computer that i want
PCI ComCommunication controller
Universal serial bus USB controlller
Seems are missing kindly provide me the direct links for ddownloading the drivers
windows 7 64bit for network and Ethernet adopters.
Iam also having same problem and providing the date as you suggested.
PCI VEN_14E4 DEV_4727 SUBSYS_00101028 REV_01 4 2A81CE39 0 00E1
If you are not sure which driver to download and where to download, then you may need to use an automatic driver finder tool.
Make sure that you have available internet connection when using this tool. If not, you may need another special tool called DriveTheLife for Network Card which would find and install network drivers witout internet connection.
Not sure if anyone is still following this thread, but I have the exact same problem and see the exact same thing in my device manager as the pic above. I have downloaded all the recommended drivers from dell for my service tag, but the device manager still says I have no driver for the network controller. I did a windows 7 reinstall after my hard drive crashed. I have a dell inspiron 3647, service tag: ADMIN NOTE: Service tag removed per privacy policy, any help would be appreciated before I throw the think out and buy a new one.
I downloaded Obit Driver Booster2 to update the drivers.
Ethernet free download Install the right network driver for your PC automatically even without Internet connection. Dell Downloads.
Are you looking some tips to install Ethernet drivers in Dell XPS M1530 laptop. Dell XPS M1530 laptop comes with Marvell 88E80XX 10/100 Ethernet Controller.
Sputnik Feedback need Ethernet adapter for XPS 13 - suggestions. in Ethernet port on Project Sputnik Feedback need Ethernet adapter for XPS 13.
Check Activation Status Of Office 2010
The Office 2010 package you are using on computer comes activated based on the distribution channel used to buy. The most common being product key available for.
Aug 29, 2010 How to check the activation status type of Microsoft Office 2010. check the activation type and status STATUS for activation status. If Office.
If you d like to check the activation type and status of your Microsoft Office 2010 installation, on your Windows, then you can do so as follows:
1. Open a command prompt with administrative privileges.
2. To navigate to the Office14 folder:
for 32bit Office on 64bit OS – Type cd Program Files x86 Microsoft Office Office14 and hit Enter
for 32bit Office on 32bit OS and 64bit Office on 64bit OS: Type cd Program Files Microsoft Office Office14 and hit Enter
3. Then type: cscript ospp.vbs /dstatus and hit Enter.
4. Look at LICENSE NAME for license type and LICENSE STATUS for activation status
If Office is KMS activated you will see KMS_Client edition in the license name field:
If Office is MAK activated you will see MAK edition in the license name field:
If Office is Retail activated you will see Retail edition in the license name field:
Sometimes based on a situation you may need to check or change a Product Key when it comes to Licensing. In my case I had a user that had an install from elsewhere and come to find out it was on trial. The big red bar was now across the top of his applications. He told me it was activated before but I had to see for myself. Good thing I did. using the following method. I also included how to change a Product Key if needed.
Open an administrative level command prompt. To do this, click on the Start Menu, type CMD in the Start Menu search box, right-click on the Command Prompt entry and select Run as administrator.
After opening the elevated command prompt, navigate to the Office14 folder:
Use the command: cd Program Files x86 Microsoft Office Office14
on 32-bit OS and 64-bit Office or on 64-bit OS
Use the command: cd Program Files Microsoft Office Office14
Execute the following command:
After the successful execution of the command, look at
a. LICENSE NAME for license type
b. LICENSE STATUS for activation status
Open one of the office programs like WORD, click on the FILE tab and then HELP you should see Change Product Key.
I hope that this helps you if you are looking for these answers.
If you d like to check the activation type and status of your How to check the activation status type of Activation status type of Microsoft Office.

TechNet Blogs Office Deployment Support Team Blog How to check the activation type and status of Office 2010 installations.

Microsoft Office 2010 was released back in June, 2010 and has different types of activations like Multiple Activation Key MAK, Key Management Service KMS for.

Wdtv Hd Media Player Firmware Update

Product Firmware; Product Downloads; WD Community; MyCloud.com MyCloud.com; Online Learning Center; SDK Developer Kit; Software Downloads.

How to update the firmware on a WD TV HD Media Player (Gen 1 and Gen 2)

Hi, WD-TV HD media player, WD Community Archives. WD TV HD. and use the correct firmware: WDTV HD Original model WDAVN00 .
Acronis True Image WD Edition Software
Data Lifeguard Diagnostic for Windows
WD Drive Utilities for Windows
WD Universal Firmware Updater for Windows
If your product is not listed above, no firmware is available for download.
Your firmware version can be found by going to the device s web interface and looking for the Firmware section.
How to update your WD TV HD Media Player WD Storage Systems with RAID 1. DOWNLOAD Download the firmware update. 4. SELECT Select settings from the on.

Firmware for WD TV HD Media Player a WDTV HD Media player last week. Firmware version the player i am blocked from making any changes to the media player.
WD TV HD Media Player Firmware Release the drive will become read only media. the system automatically enters firmware upgrade mode. 10. Once the update.
This answer explains about how to update the firmware on a WD TV HD Media Player Gen 1 and Gen 2. END
Current Firmware for the WD TV HD Media Player
Please, follow the steps below for updating your WD TV HD Media Player Gen 1 or WD TV HD Media Player Gen 2 :
Download the appropriate firmware for your WD TV HD Gen 2 or Gen 1.
Open the firmware update. ZIP file and extract the files . BIN and. VER on the Gen 1 model. BIN. VER, and. FFF on the Gen 2 model to a USB drive s main directory.
Turn the WD TV on and connect your USB drive.
When you connect the USB drive, the WD TV should take you straight to a screen that says New Firmware Found, and it should be highlighted. Simply press Enter.
Note: If the WD TV does not find a valid firmware, you will go to the normal WD TV Menu. Also, you will not find any firmware update option in the menu.
You will be prompted to perform the firmware update. Select OK and press ENTER. This will restart the system.
After restarting, the system automatically enters firmware update mode.
Once the update process is completed, the HD media player will restart again.
Both files must be directly on the drive, and not in a folder.
Do not rename either of the files.
The WD TV should recognize the files immediately. If not, then double check the above points, and make sure that you have firmware that s newer than what you currently have on the WD TV.
The firmware update can take up to 15 minutes.
In case the answer did not answer your question, you can always visit the WD Community for help from WD users.
Please rate the helpfulness of this answer.
I just bought a WDTV HD Media Player. How do I know what is the latest update which is already on my Media Player Latest Update on WDTV HD Media Player.