Cubase Asio Driver Setup
Reload Frameset
Home
German Pages
Contents:
1. Introduction
You have to make several configuration for running the EWS64 with Cubase 5 reliably. Otherwise
you will run in several troubles.
Before you configure the Cubase settings you should complete first the following settings in
the Windows control panel:
First reduce in case of Windows 9x the count of Virtual Channels to a minimum look at chapter
Virtual Channels.
Next step is to optimize the Wave Play Buffer Latency look at chapter
Wave Play Buffer Latency.
Set the Codec as prefered Play and Record device in the Control panel/Multimedia.
After these steps you can configure the cubase 5 settings.
Back to the top
2. ASIO multimedia driver setup
You will find these settings in the Advanced options in the included ASIO Multimedia Setup of Cubase 5.
In these settings you have to determine the buffersizes of all inputs and outputs including the unused.
You have to do this for all cases: 32.000 Hz, 44.100 Hz and 48.000 Hz.
Cubase is able to do this automatically but not always successfully..
Don t forget to switch the particular samplerate in the control panel of the EWS64.
As Sync Reference choose Sampleposition - Output, at Card Options select Full duplex,
open all devices before start and use 16-bit only.
Based on my experience the option start input first should be deactivted.
In the Prioritylist of the Outputs the EWS Wave Play 1 should be placed on the first postition.
In this case the EWS Wave Play 1 is the Sync Reference.
After these steps you should determine the Buffersizes for all In- and Outputs and additionals soundcards
if existing. Test your configuration with the button Run Simulation.
Important:
If you will get as result: Test is completed successfully, the ASIO-Multimedia-driver
will work with Cubase. In case of any other result you have wrong settings Buffersize
or Latency settings.
Attention:
In most cases extensive tests are necessary to get the correct settings.
Hint:
For testing under Windows 9x use the Program WAVBENCH.EXE from Terratec. This program can change the
Wave Play Buffer Latency without Windows reboot. Windows 2000/XP user can change this setting via control
panel without Windows reboot.
Note:
Don t forget the buffersize determination for all samplerates: 32.000 Hz, 44.100 Hz and 48.000 Hz.
There are different values for each samplerate.
Very important note for the Codec of the EWS64:
My very important recommendation is to deactivate the Codec if you work with Cubase. Be sure,
that the EWS64 Codec Play and the EWS64 Codec Record are switched off. Nevertheless you have to determine
the buffersize for both devices.
Don t activate all EWS64 Wave Play Drivers .
There are two important reasons to do so. On my Cubase-setup only EWS64 Wave Play 1 and EWS64 Wave Play 2
are active for 2 Virtual Channels and that is normally enough.
This configuration has two advantages:
The first is - Lower Processor Usage
and the second is - an additional audioprogramm can work at the same time while running Cubase 5. For this
program for example WaveLab you can configure EWS64 Wave Play 3 as output, and EWS64 Wave Play 4
will keep free for other requirements for example Windows Sound System.
With this configuration the programs coexist without any problems. They can play audiodata
at the same time. Recording at the same time is not possible.
A last hint to Buffersize:
Sometimes the automatic determination of the buffersizes doesn t work correctly. The simulation
returns errors with the automatically found values.
In this case you should test the values from the following tables. Doubleclick on the particular value
to change it manually.
Each EWS Wave Play driver should have the same value. The count of EWS Wave Play drivers equals the
count of Virtual channels of your system configuration. The tables are based on 4 Virtual channels.
In the first table are my results with Cubase 5.0, in the second table are my results with Cubase 5.1.
The values of the first table are often useable with cubase 5.1 too. The automatic determination of Cubase 5.1
brings different values and I cannot say which of the valuesets is the better choice. You just can try it.
Nevertheless the values of table 2 often work fine and should be tried first.
Table 1: Buffersizes, determined in Cubase 5.0 R1-R4
Device
Buffersize 32 kHz
Buffersize 44,1 kHz
Buffersize 48 kHz
State
EWS64 Wave Play 1
3072
4096
4608
Active device
EWS64 Wave Play 2
EWS64 Wave Play 3
Possibly active device
EWS64 Wave Play 4
EWS64 Codec Play
4000
5512
6000
Inactive device
EWS64 Wave Record
4096 or 8192
EWS64 Codec Record
Table 2: Buffersizes, determined in Cubase 5.1 R1
8192 or 4096
5120
7072
7680
3. ASIO DirectX driver setup
I. Windows 9x user:
You will find these settings in the Cubase menu Options/Audio Setup/System button ASIO Control Panel.
Before you can do this setup you have to select ASIO directX driver as ASIO-device.
For this EWS64 driver you need to do a the following settings:
Move the EWS64 DirectSound driver 1 to the top position and activate it. So this driver
will be the Sync Reference. If you want to use additional Virtual Channels you can activate more
EWS64 DirectSound drivers 2, 3.
The buffersize should have the standard determination value of 3000.
The CS4232 DirectSound driver EWS64 Codec entry should normally set inactive.
Unfortunately the entries of the EWS64 DirectSound driver list are too large. The important last digits
with the driver number 1, 2.. are invisible. If you select an entry, you can see the full name below the window.
So you can find the EWS64 DirectSound driver 1 entry for making the described settings.
The ASIO DirectX driver for Windows 9x:
II. Windows 2000/XP user:
You will find these settings in the Cubase menu options/audiosettings/system button ASIO control panel.
In Windows 2000/XP you cannot access the Virtual channels via directX like in Windows 9x.
Only the Codec is supported from directX under Windows 2000/XP. Therefore you can select the codec only in this
menu.
The buffersize should have the standard determination value of 3000.
Special note:
I don t recommend to use this driver with Cubase.
The Virtual channels aren t available only Playback by Codec, also you cannot record with this driver.
The ASIO DirectX driver in Windows 2000/XP:
4. ASIO DirectX full duplex driver setup
You will find these settings in the included ASIO directX setup of Cubase 5.
You have to setup 5 settings:
A. Sync Reference:
select Direct Sound Output.
B. Card Options:
activate Full Duplex and deactivate Start Input First.
C. Direct Sound Output Ports:
You will get a list with several entries: CS4232 direct sound driver for the EWS64 codec
and several EWS64XL directSound5 driver depending on the count of active virtual channels.
Bring the EWS64XL DirectSound5 driver 1 entry on the first position and activate it.
You can activate additional drivers if you need. That makes sense if you need both outputs
of the EWS64 or if you want use particular V-channels with effects.
Unfortunately the entries of the EWS64XL DirectSound drivers list are too large. The important last digit
of the driver number is invisible. If you mark an entry, you can see the full name below the window.
So you can find entry EWS64XL DirectSound driver 1 to select the described settings.
D. Direct Sound Input Ports:
There are two entries: EWS64XL Wave Record und EWS64XL Codec Record.
Bring the EWS64XL Wave Record to the first position and activate it.
EWS64XL Codec Record should normally set inactive.
E. Buffer Size:
Use the standard values 2048.
The ASIO DirectX full duplex driver in Windows 9x
Windows 2000 doesn t support the access of the Virtual channels via directX. W2k supports
the access of the EWS64 Codec via directX only.
Therefore in w2k the menu Direct Sound Output Ports offers the Codec only for selection.
Important note:
The ASIO DirectX full duplex driver in Windows 2000/XP:
5. Terratec EWS64 ASIO driver setup
You will find these settings in the cubase menu Options/Audio Setup/System button ASIO Control Panel.
First you have to select the TerraTec EWS64 ASIO driver as your ASIO-device.
You have to make several settings:
A. Select Playback Device :
You can select either EWS64 ASIO Play 2 channels or EWS64 ASIO Play 4
channels. In 2 Channel Mode you can access Out 1 only.
In 4 Channel Mode you can access Out 1 and Out 2.
B. Use Record und Buffersize :
If you do records with the EWS64 ASIO drivers, you have to activate the Use record -option.
In this case and if you use EWS64 ASIO Play 2 channels I recommend a buffersize of 1024.
These settings are the standard settings for recording. Note: for recording activate the EWS64 input
in menu devices/VST-inputs. The latency time of the EWS with these settings is 23ms.
If Use record is deactivated, you can choose a buffersize of 512.
EWS64 ASIO Play 2 channels as playback device The latency time decreases to 12ms,
but it s impossible to make records.
These settings are the best choice for playing VST-instruments with an external MIDI-keyboard.
You will have the smallest latency time between key attack and appearing of sounds.
For later recordings activate the Use record option and change the buffersize to 1024 or higher.
The correct values for Buffersize depend on your PC-hardware.
It might be you need higher values like 1536 or 2048. In this case the latency time will increase to
35 or 46 ms.
The descriped values on this page are working on my PC Pentium II/400, BX-Chipset, 384 MB RAM.
C. Priority :
Normally use high. In case of problems with playback and/or recording use highest.
In case of older PC s like my PC highest often brings more stability.
D. EWS64 ASIO driver and Wave Play Buffer Latency :
In most cases the reason for instability of the EWS64 ASIO driver is a wrong Wave Play Buffer Latency value.
Make a step by step test of several values to fix this problem.
A simple way for this test is the Program WAVBENCH.EXE. You do not need to reboot you PC after changing
latency values. Run WAVBENCH.EXE and Cubase at the same time and change the Wave Play Buffer Latency
until your system becomes stabil look at chapter
E. A last hint to Buffersize :
This setting and the Wave Play Buffer Latency is very important for the EWS64 ASIO driver.
For each four possibilities: 2-channel playback no record, 2-channel playback with record,
4-channel playback no record and 4-channel playback with record you have to find out the right
settings. Do several tests until you have your results and make your notices for remeber.
Terratec EWS64 ASIO driver settings in Windows 9x:
You can make several settings:
A. Channel Mode :
You can select either 2 Channel Mode or 4 Channel Mode.
In 2 Channel Mode you can access Out 1 only.
In 4 Channel Mode you can access Out 1 and Out 2..
B. Buffersize :
The correct values for Buffersize depend on your PC-hardware. You have to find out
the right values for both channel mode settings. Do a step by step test.
C. TerraTec EWS64 ASIO driver and Wave Play Buffer Latency :
In most cases the reason for instability of the TerraTec EWS64 ASIO driver is a wrong
Wave Play Buffer Latency value.
Make a step by step test of several values to fix this problem look at chapter
D. A last hint to buffersize :
This setting and the Wave Play Buffer Latency is very important for the TerraTec EWS64 ASIO driver.
For both possibilities 2-channel mode and 4-channel mode you have to find out the right
TerraTec EWS64 ASIO driver settings in Windows 2000/XP:
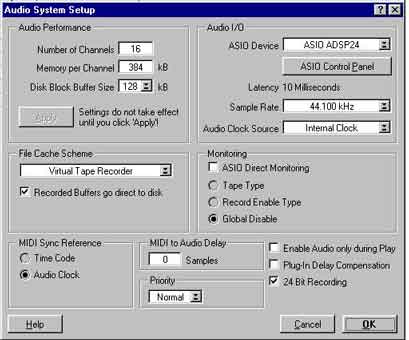
6. Cubase Audio System Setup
You will find these settings in the cubase menu Options/Audio Setup/System. My following references
for settings are advices only. Different settings for your PC might be possible.
Look at your Cubase manual during your tests. At chapter Audio Optimizing you ll find a lot of hints
to all settings.
Hints to every setting:
A. Audio Performance:
3 settings are available: At Number of Channels select 16 max. The EWS64 can handle 7 stereo tracks or
12 mono tracks max.
The less audio tracks are active the less CPU power is necessary.
In case of audioperformance problems you should reduce this setting.
For Memory per Channel use 256 kB. For Disc Block Buffer Size use 64 kB Recommendation from Steinberg.
I ve made good experience with these values.
B. File Cache Scheme:
It is very hard to give any recommendations at this point. Look at the Cubase manual for
further information. Start with following settings: Tape Recorder / Audio Sequencer and
Recorded Buffers go direct to disk activated. In case of recording problems deactivating of the option
Recorded Buffers go direct to disk could perhaps improve the audio performace.
C. MIDI to Audio Delay:
The standard value for this setting is 0. Only in case of time delay between Audio and MIDI Tracks you
should change this value. Look at the Cubase manual for further information.
D. MIDI Sync Reference:
Standard value is Audio Clock. For most users this is the best choice. If you have to synchronize
professional external devices the setting Time Code could be the better choice. In this case you
have to make additonal settings in the Cubase menu Options/Synchronization.
Look at the Cubase manual for further information.
E. Priority Settings:
You should deactivate the Expert Mode normally. In case of persistent performance problems with the EWS64 in Cubase
you can activate this setting for changing the Cubase Internal Priorities. You will have
four different possibilities. Find out the best choice during your tests. Look at the Cubase manual for
further information.
F. Audio I/O:
You have to make 3 settings: Choose one of the four possible EWS64 drivers in ASIO Device
several hints are following. At Sample Rate select the same rate as you had selected for the
EWS64 in the EWS64 control panel. If you don t do so Cubase will not work: If you have different
sample rate settings you will not have any chance for a running system.
Audio Clock Source has to be set to internal. In case of active ASIO driver the value is:
set by EWS Control panel. Do not make changes in any case.
G. Monitoring:
Select Global Disable for this setting. In case of any activation you have the risc of bad feedbacks. This
can cause in destruction of your speakers, headphones and/or your amplifier.
Hint: The option ASIO Direct Monitoring is selectable only if you use the TerraTec EWS64 ASIO driver
with activated Use Record.
H. Enable Audio only during Play:
Normally this option should be inactive. It can be usefull for problems with legacy soundcards.
You do not need to set this for the EWS64.
I. Plug-In Delay Compensation:
Activate this option in any case.
J. Advanced Multi-Processing:
This option is available only, if you have 2 or more CPUs and NT4, Win2000 or WinXP.
In Win98 this option is not available. This option configures the Cubase workload distribution.
Because of no own experience I cannot give any hints. For further information
read the cubase manual.
K. Bit Recording:
The standard value is 16. The EWS64 doesn t support higher bit-rates. It might be that
True Tape 32 works too, but I did no tests any time.
L. Panning Law:
If you make records via the digital inputs or the EWS64 internal recording bus
setting Mix in the EWS64 control panel you should select the value 0dB.
With this value you will not get weaken input signals. The results of your recordings
will have the optimum of max. record level.
In case of records via any analog input EWS Analog In 2 you should select the values 0dB or -3dB.
In most cases -6dB are too much I guess because of the loss of level.
I always use 0dB because I do my panning adjustments after recording with the VST channel mixer.
7. Additional important settings in Cubase 5
For a good working with Cubase without any problems you have to do some additional settings:
I. MROS- and System Resolution:
You will find these settings in the Cubase menu Options/Synchronization. At PPQN you can set the
value of the internal accuracy for the MIDI-data time resolution of Cubase. For an optimal
MIDI-timing you should set the value 1920. The usefull setting range starts with 384.
Very important is the value for System Preroll. This value sets the time range for the
pre calculation of MIDI-data in Cubase. This value should always be higher than the latency-time of the soundcard.
For EWS64 user the correct value depends on the choosen Cubase EWS64-driver configuration 7 possibilities,
because these 7 possibilities have different latency times.
For the ASIO MME driver you have to set a minimum amount of 650,
for the TerraTec EWS64 ASIO driver I recommend values between 50 and 100 depending on the
choosen ASIO-configuration and ASIO-Buffersize.
You will find the actual latency time in menu Options/Audio Setup/System
below the button ASIO Control Panel.
Better hints for the correct values are impossible because the correct values are depending on your PC-hardware.
But you can be shure, that you will get in trouble with Cubase if this value is too low or to high.
For this reason I recommend to make own tests with different values until your system works fine.
In case of changing the audio driver under Cubase you could get the question The audio driver was changed -
Should Cubase adapt the Preroll Time.. In this case answer always Yes.
II. Play in Background
This option should be active in any case. You will find this option in menu Options.
Set the checkbox Play in Background.
III. Key Command Preferences
If you don t get any sound by pressing key c6 on your MIDI-Keyboard, then the cubase remote control
is active. You will find this setting in menu Edit/Preferences/Key Commands.
After deactivating the checkbox Remote active all keys of your MIDI-Keyboard will be activated for MIDI-playback.
IV. Audio recording in Cubase
For any audio recording with Cubase the VST Input has to be active.
Goto menu Panels/VST Inputs : the green button ACTIVE has to be light green.
V. Additional settings
There are a lot of additional settings, but it is not possible to describe every Cubase-setting at this place.
For further information use cubase help and look at your Cubase manual.
8. Cubase MME-settings
These settings are configurable with the program Setup MME which is delivered with Cubase.
You can configure which MIDI-ports will be used from Cubase and in which priority they are shown.
In MME-Outputs it is recommended to put EWS64 Play to the first position. With this setting every
MIDI-tracks are using the EWS64-Synthesizer as their default.
MIDI ports reserved for other programs like Ed.son should
be deactivated, especially the non-multiclientable ports of the EWS64 Outputs: EWS64XL MIDI 2, EWS64XL FM Synthesis
and all installed virtual MIDI-ports; Inputs: EWS64XL MIDI 2, all installed virtual MIDI-ports and all
installed EWS64-MIDI-monitor-clients.
The conditions for the outputs EWS64XL MIDI Play und EWS64XL MIDI 1 and the input EWS64XL
MIDI Record are different. These ports are multi clientable depending on your configuration in the
Windows control panel/Device Manager/TerraTec Audio Devices/EWS64 Synthesizer Settings.
You can use these ports simultaneously with different audio software e.g. Ed.son, even if they
are activated in Cubase. This is easily possible with increasing the value of MIDI-clients in the
EWS64 Synthesizer Settings/MIDI-clients to values bigger than 1.
Conclusion:
The MIDI-Setup for the EWS64 is a very complex theme and you have to get a lot of experience
for success. On the other hand no other known soundcard offers multi clientable MIDI drivers.
I guess in practice it s a very usefull feature. For each other soundcards you need any third party software
like Hubis MIDI-Loopback-Device to enjoy the advantages of multi clientable MIDI-devices.
9. Additional information for EWS64 drivers
At this place I will give additional hints about the several EWS64-driver which are usable for Cubase.
I. Windows 9x-User:
Windows 9x user can choose up to seven different driver configurations:
ASIO directX driver latency: 203 ms
ASIO directX full duplex driver latency: 46 ms
ASIO multimedia driver latency: 557 ms
TerraTec EWS64 ASIO driver 2 channel-playback no recording latency: 12 ms min.
TerraTec EWS64 ASIO driver 2 channel-playback with recording latency: 23 ms min.
TerraTec EWS64 ASIO driver 4 channel-playback no recording latency: 23 ms min.
TerraTec EWS64 ASIO driver 4 channel-playback with recording latency: 46 ms min.
A good question at this place is: What s the best choice.
It s quite difficult to find the right answer: The best solution always depends on what you want to do
with your EWS64.
For recordings of VST-instruments configuration 4 is the best choice. You will have the smallest latency
and hear all sounds immediately after touching the keys.
For the distribution of the internal effects Chorus and Reverb and native playback over the virtual
channels configuration 2 and 3 are the best choice.
Especially in case of legacy PCs with low CPU power these settings are very usefull. You can use the internal
effects in place of VST-effects.
4-channel productions are possible only with configuration 1, 2, 3, 6 or 7.
Fact is: There is no configuration, which could be the best choice for all requirements.
I m using configurations 4 or 5 as default, because I like VST-instruments and these configurations
offer the smallest latency 12ms or 23ms min..
During the work with a Cubase song it s possible to change the configuration:
Configuration 4 for recording VST-instruments with buffersize 512 and latency 12ms and
Configuration 5 for recording audio tracks increase the buffersize to at least 1024..
It s the best way to adapt the configuration on the actual requirements.
I don t use the configuration 1 because I don t see any advantage and recording is impossible.
With configuration 1, 2 and 3 it s possible to use the particular features of the Virtual channels.
Configuration 2 has the smaller latency, but configuration 3 often runs much more stabil and offers
a final mixdown when other drivers fail. Unfortunatelly 3 is unsuitable for VST-instruments latency: 557ms
The EWS64 synthesizer doesn t work with directX-driver. Therefore three configurations are usefull only:
Terratec EWS64 ASIO driver 2 channel-playback with recording latency: 17 ms min.
Terratec EWS64 ASIO driver 4 channel-playback with recording latency: 34 ms min.
For recordings of VST-instruments configuration 2 is the best choice. You will have a latency of 17 ms
with ASIO-Buffersize/Channel value 512.
Configuration 3 is usefull if you need both outputs of the EWS64. The ASIO Buffersize/Channel has to be 1024
or bigger. The latency increases to 34ms min.
Configuration 1 is usefull if you need the particular features of the Virtual channels.
In any other case the both ASIO drivers are the better choice.
Make several tests to find out which configuration is the best for your situation. Basicly the ASIO-drivers
are the best choice.
10. Settings for the EWS64-Control Panel and the FX-Panel with Cubase
If you plan to use reverb and chorus in your Cubase song, you have to activate these effects in the FX-panel first.
Additional you must set the MIDI Reverb Send and the MIDI Chorus Send values to 64 for correct working
of both effects in Cubase.
If you want to set the EQ with my EWS64 Master-Mixermap, please set the Equalizer to 4-Band EQ for activating
the EQ-controllers in this mixermap.
The controlling of the MIDI-Master Volume and the settings of programs and any effect-values are very comfortable with
my EWS64 Master-Mixermap. The advantage is: You can save the settings with a mixermap-snapshot in a mixertrack.
If you load the song any time later the identical settings are sent to the EWS64.
Important note about the EWS64-equalizer:
If you want to use the EWS64-equalizer for music production, than you need a work around. The equalizer works
for the Out1 only, but you cannot choose Out1 as recording input. In recordsetting Mix for waverecords
the EQ not included too.
Therefore we have only one wayout:
Use a cinch cable to connect the DIG Out 1 with DIG In. Now you can make records via DIG In
including the EQ. The EQ doesn t work with Out 2 anyway.
Note about the switch Clip on/off in the EWS64 control panel:
How does it works: with clip on overrides of the synthesizer will caught softly. This avoids horrably sounding
distortions. The electronic works near like a limiter of professional mixers or amplifiers.
The sense of activating clip on depends on the situation:
Case 1: you want to playback a bigger MIDI-song recording to an audiotrack at the same time. Set clip on
to avoid digital clippings in your record.
Case 2: You want to remaster audio data to a Digital Audio Tape DAT or want to remix several audio tracks
to a single track.
Set clip off to get a 1:1 result without any changes of the original audio dynamic.
11. How many MIDI-voices does the EWS64 play at the same time.
The count of the simultaneously playable MIDI-voices depends on the number of
activated Virtual channels and the activated EWS64-effects
reverb, chorus, echo In2, EQ and V-Space.
Basicly we can say: The more Virtual channels or effects are active the less MIDI-voices are playable
at the same time.
The reason for this is the internal structure of the EWS64-synthesizer. It is organized into 64 so called slots.
Each slot is able to play either a mono audio track no matter if MIDI or audio or the slot is used for
an EWS64-effect.
The following table will give an overview about usage of slots in case of virtual channels and effects.
This will give you the possibility to calculate the remaining slots for MIDI-voices depending on your
individual EWS64-setup.
Virtual channels:
Each Virtual channel uses two slots. In case of 8 Virtual channels we need 16 slots.
Reverb:
The reverb uses 13 slots.
Chorus:
The chorus uses three slots.
Equalizer:
The equalizer uses in case of 4-Band-EQ 8 slots.
In case of 2-Band-EQ I don t have any information, but it should be max. 4 slots.
V-Space:
V-Space uses one slot.
Echo In 2:
Unfortunately I do not have any information about the used slots of Echo In 2.
The following example shows a method how to calculate the available MIDI-voices:
Let us assume, that 4 Virtual channels, Reverb, Chorus and EQ 4-Band Mode are active and Echo In 2 and V-Space are inactive.
In this case we need for the Virtual channels 8 Slots, for Reverb 13 slots, for Chorus 3 slots and for EQ 8 Slots.
This means in practise: 64 the total amount of slots -8 -13 -3 -8 32 Slots.
In this case 32 slots will be available for MIDI-voices.
What can we finally say as result.
You should always turn off all unused effects in the FX-panel. That will increase your amount of
available MIDI-voices. Especially V-Space and Echo In 2 are used rarely and should be switched off
normally. Also you shouldn t use to much Virtual channels.
For example a decreasing from 8 to 4 VCs will offer 8 additional slots for MIDI-voices.
At this place further important infos:
It depends also on the particular instruments, how many MIDI-voices the EWS64 is able to play at the same time.
A mono-instrument needs just one slot for each voice, a stereo instrument needs two one for left channel
and one for right channel. In case of 32 free slots any stereo instrument only can play 16 voices
simultaneously.
This fact will be harder in case of instruments with many samples per key multi layer instruments.
In case of 3 simultaneous stereo layers we need 6 slots for each key. In case of 32 free slots we only
can play 5 voices of such an instrument at the same time.
C/O 2002-2012: Werner Ogrodnik Cologne, Germany.
Setup of the EWS64 in Cubase 5: Getting into the details Contents: Introduction; ASIO multimedia driver setup; ASIO DirectX driver setup; ASIO DirectX fullduplex.

How to Use ASIO in Cubase. The Audio Stream Input/Output, or ASIO, standard provides a way for virtual instruments that use Steinberg s Virtual Studio Technology.
Akai EIE and EIE Pro - Setup in Cubase. Containing 4 routable inputs and outputs, On a Mac, select the ASIO Driver dropdown menu, select EIE or EIE Pro.
Home Support FAQs Search Result: AUDIOGRAM
Installing ASIO4All USB ASIO Driver in a Windows PC
1 Download driver file from here:
2 Install the driver using the supplied. EXE file.
3 Open Cubase and click on DEVICES and then DEVICE SETUP from the dropdown menu.
4 Click on VST AUDIO SYSTEM.
5 Click the dropdown arrow next to the ASIO Driver selection box and select asio4all v2 from the popup list.
6 Click on CONTROL PANEL to see all the WDM devices.
8 Turn off the internal sound card and select USB AUDIO CODEC by clicking on the soft buttons.
9 Click on the wrench icon in lower right corner.
NOTE: Now the USB Audio Codec will have a sign.
10 Click on the sign and verify the 2x inputs and 2x outputs have the little square and triangullar blue icons next to both of them.
11 Leave the DEVICE SETUP.
12 Reselect device then click on VST CONNECTION.
13 Verify that the audio device on the Inputs AND Outputs is the asio4all and that the ports are Audio Codec 1 and Audio Codec 2
NOTE: You may have to reboot Cubase to get it to accept the driver and release the internal soundcard.
Return to Top.
This page explains what asio drivers are, using asio to fix playing problems in cubase, asio4all and some good asio audio soundcards.. Cubase asio driver download.

Installing ASIO4All USB ASIO Driver in a Windows PC
Installing ASIO4All USB ASIO Driver in a Install the driver using the supplied. EXE file. 3 Open Cubase and click on DEVICES and then DEVICE SETUP.

